Search This Blog

Saturday, August 29, 2015

convert the GPT disk to MBR

1) Log on as administrator account.
2) Click Start button and right-click Computer from the menu.
3) Click Manage.
4) On the Computer Management snap-in, click to select Disk Management from the left pane under Storage category.
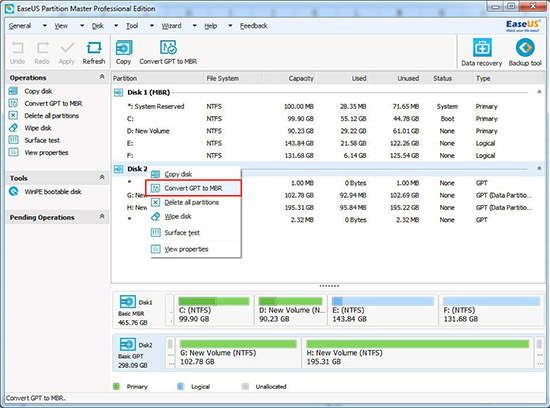
5) On the right pane, ensure that the hard disk drive on which you want to install Windows 8 has no partition.
6) Then right-click the name of the disk (e.g. Disk 1) and click Convert to MBR from the context menu. (If the disk already has partition, Convert to MBR option would be grayed out and would be disabled).
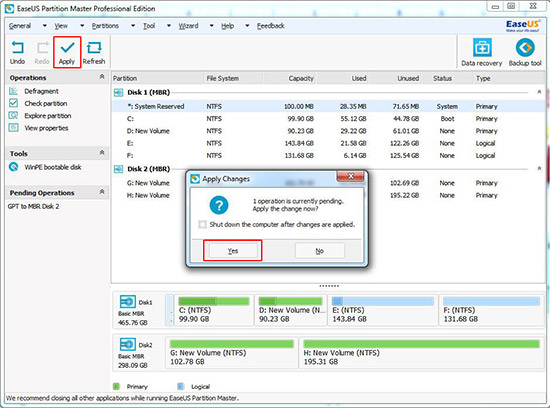
7) Try installing Windows 7 now. It should work this time.

If the above fails, when you get to the 'Where do you want to install Windows' screen, assuming you will want 7 installed on the SSD, choose 'Drive Options(Advanced)' and delete all the partitions on the SSD so all you have left is Unallocated Space. Proceed with Install, Windows will do the rest. Then you'll have to do some careful house keeping to make sure all your User data is directed to the HDD, and set up the SDD for max efficiency... personally I would stick with 8 and tailor it to your own tastes...

Hope this helps.

Add To Google BookmarksStumble ThisFav This With TechnoratiAdd To Del.icio.usDigg ThisAdd To RedditTwit ThisAdd To FacebookAdd To Yahoo

How to Convert GPT Disk to MBR Disk

GUID Partition Table, short for GPT, is a standard for the layout of the partition table on a physical hard disk. Although it forms a part of the Extensible Firmware Interface (EFI) standard, it is also used on some BIOS systems because of the limitations of MBR partition tables, which restrict maximum disk size to 2 TB.
Master Boot Record is short for MBR. It is the 512-byte boot sector that is the first sector of a partitioned data storage device such as a hard disk. When a data storage device has been partitioned with the MBR partition table scheme, the master boot record contains the primary partition entries in its partition table
The following will show you how to convert a GPT disk to a MBR disk with EaseUS Partition Master, Windows Disk Management and command prompt for free.

Solution 1: Convert GPT disk to MBR disk with EaseUS Partition Master

EaseUS Partition Master can directly convert GPT disk to MBR disk without any data loss (hard disk with system installed is not supported). You can also use EaseUS free partition software to solve other partitions cases such as tomove gpt partitionpartition gpt disk etc. Compared to Disk management and command prompt, it won't require to deleted disk volumes. Therefore, it is the safest and the most reliable way.
1. Launch EaseUS Partition Master.
2. Select the GPT disk that you want to convert to MBR disk. And then click "Convert GPT to MBR".
Convert GPT to MBR
3. Choose “Apply”, you will see that the GPT disk has been converted to MBR disk. All data is safe with EaseUS partition manager software.
GPT to MBR disk without any data loss
Tips to convert gpt to mbr with Disk Management and Command Prompt:
1. You must have administrator privilege to do this in Windows.
2. Before you convert a disk, be sure to backup anything on the GPT disk that you want to convert to MBR disk. Converting the disk requires that all partitions and volumes are deleted on the disk first.

Solution 2: Convert GPT disk to MBR disk with Windows Disk Management

1. Right click "My Computer" and choose "Manage" -> "Storage" -> "Disk Management".
2. Delete all volumes on the GPT hard disk which you want to convert to MBR disk. This action would cause data loss if there are important data in your disk volume.
Delete all volumes
3. Right click on the hard disk 1 and choose "Convert to MBR Disk". After you convert GPT disk to MBR disk, you can create partitions on the now MBR disk if you like.
Convert GPT disk to MBR disk

Solution 3: Convert GPT disk to MBR disk via diskpart command

In the following case, I would like to convert disk 1 into MBR disk.
1. Input “DiskPart” at the search bar.
2. Type list disk and press enter.
diskpart command: list disk
3. Type select disk 1 and press enter.
4. Type detail disk and press enter. This will give you a list of all the volumes on the selected disk. If you do not have any volumes listed, then you can go to step 7.
diskpart command: detail disk
5. Type select volume 5 and press enter.
6. Type delete volume and press enter.
Repeat steps 5 and 6 for each volume listed in step 4 until you have deleted all the volumes.
7. Type select disk 1 and press enter.
8. Type convert mbr and press enter.
diskpart command: convert GPT disk to MBR disk
9. Type exit and press enter.
Now you’ve successfully converted gpt to mbr. If you do not waste time backuping up data, EaseUS Partition Master can be your best choice. You can also read the tutorial of converting MBR disk to GPT disk.


Add To Google BookmarksStumble ThisFav This With TechnoratiAdd To Del.icio.usDigg ThisAdd To RedditTwit ThisAdd To FacebookAdd To Yahoo

How To install Windows 7 on a pre-installed Windows 8 computer

Boot

Many new Windows8 pre-installed systems will not boot from CdRom. To enable booting from CdRom you need to get into the Bios of your computer.
In this case (Acer laptop), press and hold the F2 key while restarting the system. Restarting is important; Shutdown/startup will not work with the F2 key.
  • Once in the Bios, go to the Boot section and set the CdROm device as primary boot device.
  • Disable UEFI boot
  • Exit with save & reboot
  • Startup the computer using a 3rd party boot manager that supports GPT/MBR boot record management. In this case we used an Acronis Boot Disk (created with Acronis True Image 2013).

Install - step 1 (Acronis)

Windows 7 will only install on a disk/partition with a MBR (Master Boot Record) partition table
  • From the Acronis boot menu, select True Image
  • Choose Tools & Utilities from the left menu and Add New Disk -> Next
  • Select your hard disk from the list -> Next
  • Ok to confirm deletion of all data and start paritioning --> ### double check that you have the correct disk, to prevent data loss !! ###
  • Select the required disk initialization method: MBR -> Next
  • Create partition(s) -> Next
  • Specify settings for the partition being created -> Accept
  • Proceed. MBR partition table will be created on the new disk.
  • Finish. Exit True image, remove the Acronis boot CD and restart your computer, using a Windows7 boot CD

Install - step 2 (Windows)

Install Windows7 on the newly created MBR disk.

For my Dell Inspirion 15R SE I had to go to the UEFI with F2 set secure boot to off and chnage the option Load Legacy Option ROM to true.
After a reboot you can boot from Windows 7 DVD (press F12 to see the boot menu and select the DVD) and install Windows 7.

Add To Google BookmarksStumble ThisFav This With TechnoratiAdd To Del.icio.usDigg ThisAdd To RedditTwit ThisAdd To FacebookAdd To Yahoo

Friday, August 28, 2015

How to Lock Google Chrome with a Password

Method 1 of 2: Enabling Chrome Profile Protection

  1. Lock Google Chrome with a Password Step 1 Version 2.jpg
    1
    Visit the Chrome flags page. Open Google Chrome and copy-pastechrome://flags/#enable-new-profile-management into your address bar. Hit enter to navigate to the experimental settings page, with the profile management option at the top of the browsing window.
    • Do not alter any other settings unless you know exactly what they do. If an experimental feature causes problems, return to the chrome://flags/ page and click "Reset all to default."
  2. Lock Google Chrome with a Password Step 2 Version 2.jpg
    2
    Enable new profile management. Click the drop-down menu underneath "Enable new profile management" and select "Enabled."
    • If you can't find this option, search the page for "profile management" usingctrl+F on Windows, command+F on Mac, or your device's Search or Find menu item on phones and tablets.
    • If you're certain the option is not on the page, update your Chrome browser or app and try again.
  3. Lock Google Chrome with a Password Step 4 Version 2.jpg
    3
    Relaunch Chrome. A Relaunch now button should appear at the bottom of the screen. Click this, or quit and re-open Chrome manually for the change to take effect.
  4. Lock Google Chrome with a Password Step 5 Version 2.jpg
    4
    Sign in to your Google account. Click the profile button in the top right, which may display your Google account name or a silhouetted head and shoulders. Click this, then select Sign in. Enter your Google account information or create a new Google account. Once you're logged in, the profile icon in the top right should be replaced by the name attached to your Google account.
    • The head and shoulders icon is very small on some operating systems. Look for it next to the minimize and close icons.
    • Remember your password! If you forget it while Chrome is locked, you will need to "Browse as guest" to open a non-protected Chrome window, then visitGoogle account recovery to reset your password.
  5. 5
    Create a supervised account. In order to password-protect your own account, you need to tell Chrome that you are supervising another user.
    • Go to Chrome → Preferences in the top menu.
    • Scroll down to "People" and press Add person.
    • Check the box next to "Control and view the websites this person visits"
    • Click Add.
  6. 6
    Save your work. If you have any unfinished emails, half-written forum posts, or other work in progress, make sure it is saved or copied to a text file before you lock Chrome. All tabs will be closed when you lock the account, then re-opened when you sign in again.[2]
  7. Lock Google Chrome with a Password Step 7 Version 2.jpg
    7
    Lock your Chrome profile. Click your name in the top right corner, where the profile icon used to be. If you select "Exit and childlock," all your Chrome tabs and windows will be replaced by a small window with a display of all your profiles. In order to use those tabs and windows again, you'll need to enter your Google Account password.
    • Your profile will not lock automatically when you close Chrome. You must remember to Lock the account first. There is currently no way to enable automatic locking.
    • In case you can't see the option to lock your user, you've found a bug! Go to Settings (not on the switch user screen) and create a new user. Give it whatever name you like.
  8. 8
    Troubleshoot. The supervised users feature is in beta, and there may be some bugs. If you do not have an "Exit and childlock" option, try one or more of these quick fixes:
    • Make a second Supervised User. Repeat until you get a user with the grey (supervised) text after the name.
    • Visit https://www.google.com/settings/chrome/manage. Click Manage in the Permissions section, then select "Only approved sites" from the dropdown list.
    • Relaunch Chrome.
  9. Lock Google Chrome with a Password Step 8 Version 2.jpg
    9
    Ban all unauthorized use of Chrome (optional). The profile locking setting should protect your saved passwords, browsing history, and most preferences from other people who use the computer, but they can still browse the internet using a separate profile or as a guest. If you want complete control over who accesses Chrome, you can prevent this:
    • Visit Chrome → Preferences in to the top menu.
    • Scroll down to the People section.
    • Uncheck the boxes next to "Enable Guest browsing" and "Let anyone add a person to Chrome."

Method 2 of 2: Locking Chrome without a Google Account

  1. 1
    Understand the limitations of this method. This method covers browser extensions that will add password protection to Chrome. These are not supported directly by the Chrome developers, so compared to the "Chrome profile" method, they are more likely to cause issues, stop working after an update, or (though this is unlikely) infect your computer with malware.
    • As of December 2014, the available options are also significantly less secure than the Chrome profile method.
  2. Lock Google Chrome with a Password Step 10 Version 2.jpg
    2
    Try Lock. Click here, then select "Try it now" to install the Lock extension. This lets you add a password that needs to be entered each time Chrome is opened. Once installed, click the red square in the top right of Chrome to set a password. Be aware of the following quirks:
    • The password field is not obscured. Anyone watching your screen will see your real password as you type it.
    • If you do not change the default password, it will be password. However, upon opening Chrome, the text field will say Password. Change the capital P to lowercase, and you should get through. (Then click the red square to set a real password.)
  3. Lock Google Chrome with a Password Step 11 Version 2.jpg
    3
    Avoid insecure extensions. There are several other extensions, but most have major security flaws:
    • "PassBrow" and "Browser Locker" can be bypassed by closing the first window, then opening a new one.
    • "Lock for Google Chrome" can be bypassed by checking "Stop this page from showing popups" in the password prompt box.
  4. Lock Google Chrome with a Password Step 12 Version 2.jpg
    4
    Search for a password protection app. Password protection apps have come and gone in the past. If the suggestions above are unavailable or you dislike their features, visit the Chrome webstore in your Chrome browser, and use the Search bar to look for "password lock chrome" to find alternatives. If you are using a phone or tablet, use the Chrome app store instead.
    • Always look at the average rating and read some reviews before installing. Some apps can slow down your browsing, install advertising toolbars, or cause other issues.

Add To Google BookmarksStumble ThisFav This With TechnoratiAdd To Del.icio.usDigg ThisAdd To RedditTwit ThisAdd To FacebookAdd To Yahoo

WINDOWS 10 KEYBOARD SHORTCUTS

Keyboard shortcuts can save you time as you use Windows 10. You probably already know about Ctrl + C and Ctrl +V (copy and paste), but we're here to tell you 21 other shortcuts that you should know when using Windows 10. Some of these shortcuts might already be familiar to you, but think of new users who just switched from a Mac or simply have relied more on mice or touchscreens.
Keyboard shortcutAction
Windows key + AOpen Action center
Windows key + COpen Cortana in listening mode
Windows key + DDisplay and hide the desktop
Windows key + EOpen File Explorer
Windows key + HOpen the Share charm
Windows key + IOpen Settings
Windows key + LLock your PC or switch accounts
Windows key + SOpen Search
Windows key + NumberOpen the app pinned to the taskbar in the position indicated by the number.
Windows key + Arrow keySnap app windows left, right, corners, maximize, or minimize
Windows key + CommaTemporarily peek at the desktop
Windows key + Ctrl +DAdd a virtual desktop
Windows key + Ctrl + Left or Right arrowSwitch between virtual desktops
Windows key + EnterOpen Narrator
Windows key + HomeMinimize all but the active desktop window (restores all windows on second stroke)
Windows key + PrtScnCapture a screenshot and save in Screenshots folder
Windows key + Shift + Up arrowStretch the desktop window to the top and bottom of the screen
Windows key + TabOpen Task view
Ctrl + Shift + EscOpen Task Manager
Alt +TabSwitch between open apps
Ctrl + Alt +TabView open apps
There are plenty of keyboard shortcuts on Windows 10, but we think these are the best ones to remember.

Add To Google BookmarksStumble ThisFav This With TechnoratiAdd To Del.icio.usDigg ThisAdd To RedditTwit ThisAdd To FacebookAdd To Yahoo