Search This Blog

Showing posts with label Backtrack. Show all posts

Wednesday, June 10, 2015

Hack Like a Pro: Scripting for the Aspiring Hacker, Part 2 Conditional Statements


Welcome back, hackers!
I recently began a series on scripting and have received such positive feedback that I'm going to keep this series going. As I've said before, to graduate from the script kiddie to the pro hacker, you'll need to have some scripting skills. The better you are at scripting, the more advanced your hacking. Ultimately, we are leading up to developing the skills to build your own zero day exploits.
I left off teaching you the basics of shell scripting in BASH and built a simple script that utilized nmap with our user-supplied inputs to scan for open ports on a range of IP addresses. I hope you saved that script, as we'll be building upon it here, adding additional functionality.

Step 1: Open a Text Editor

The first step in building any script is to open a text editor. You can use any text editor, but I will be using kwrite in the KDE version of BackTrack (if you are using the GNOME version, gedit works just as well).
Now, in this lesson, we'll be studying conditional statements. Those are statements within our script that enable us to make decisions. In other words, "If this happens, do this. If the other happens, then do that."

Step 2: If...then...else

The most basic type of conditional statement that is available in nearly every programming language is the if...then...else. This enables us to check for a condition (if) and if it is true, then execute some statement or statements, or else do something different. Its basic form is:
  • if <a conditional statement that evaluates to true or false>
  • then <statements to execute when true>
  • else <statements to execute if false>
  • fi
The else is optional, as the conditional statement will run without the else clause. In BASH shell scripting, every if..then must be closed with a "fi" or the reverse of the "if."

Step 3: Let's Add a Conditional to Our Scanner Script

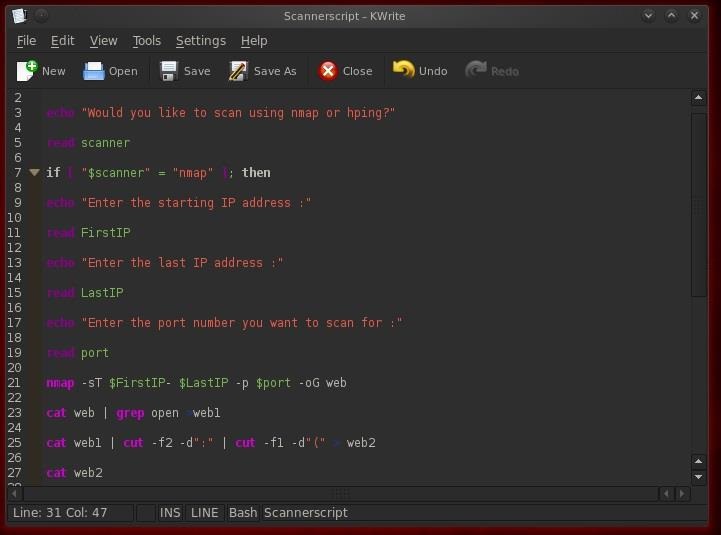
Now that we have the basic concept of a conditional script, let's add one to our scanning script named Scannerscript. Let's ask the user whether they want to use nmap or hping3 to scan the target. If they say they want nmap, then we can execute the original part of our script that does the nmap scan. If they want to use hping3, we will have to add a new section to gather info and then run an hping scan. So, our script structure should look like this:
  • if you want to run nmap
  • then run nmap prompts and commands
  • else run hping prompts and commands

Step 4: Create Our Conditional Statement

Now, let's edit our Scannerscript to give the user a choice of either using nmap or hping to scan. First, we need ask the user which they want to use with an echo statement.
  • echo "Would you like to scan using nmap or hping"
This simply asks the user to enter which scanner they would like to use and enter it from the keyboard. Next, we need to capture their input into a variable named scanner.
  • read scanner
Now, comes the key part of our conditional statement, the if...then...else. We create a statement that checks to see what value the user entered when prompted, and then sends our script to either the nmap section, or our yet to be created hping section. We can do this with the following statement:
  • if "$scanner" = "nmap" then
Please note a few things here.
First, the if is lowercase. Anything else will throw a "command not found" error. Second, I used double quotation marks around the value of the variable scanner. This is to indicate that I want a string to compare to the string "nmap". Third, when retrieving the value of a variable, I precede it with a $ sign.

Step 5: Build the Hping Scan Section

Now that we've developed our basic structure and logic of our conditional statement, let's build the hping section that will be executed if the user chooses they want to run an hping scan. Let's start by prompting the user for which IP address they want to scan and capturing the data into a variable called IPaddress.
  • echo "Which IP address would you like to scan? :
  • read IPaddress
Next, let's prompt the user which port they would like to scan and capture the data into a variable called hpingport.
  • echo "What port would you like to scan for ?:
  • read hpingport
Finally, let's ask the user how many packets they would like to send. Remember, hping continues to send packets until stopped just like the ping command in Linux (and unlike the ping command in Windows that only sends 4 packets and then stops). We can determine how many packets to scan by using the -c switch in the hping command. So, let's ask the user how many packets they would like to send and gather that info into a variable called packets.
  • echo "How many packets would you like to send?"
  • read packets

Step 6: Create Our hping3 Scan Command

Now we have all the information we need from the user and saved it into variables to create our hping3 command.
  • hping3 -c $packets $IPaddress -p $hpingport > hpingscan
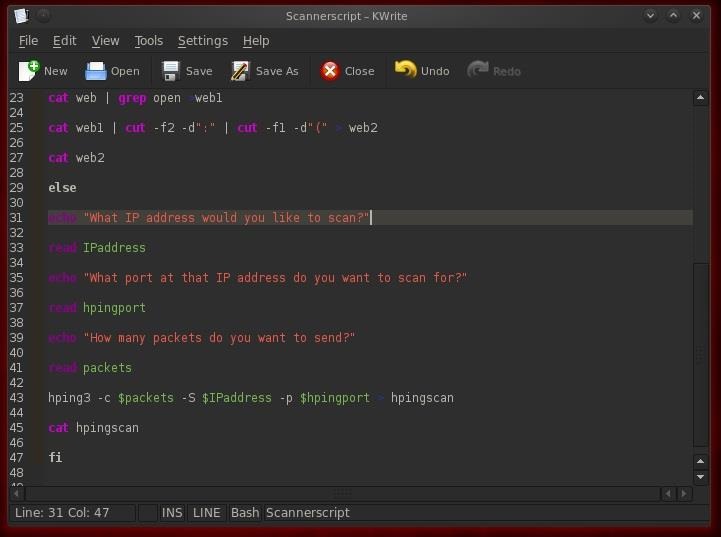
This statement says run the hping3 command and send $packets number of packets to the $IPaddress IP address, scanning for $hpingport port open and send it all to a file named hpingscan.

Step 7: Let's Test It

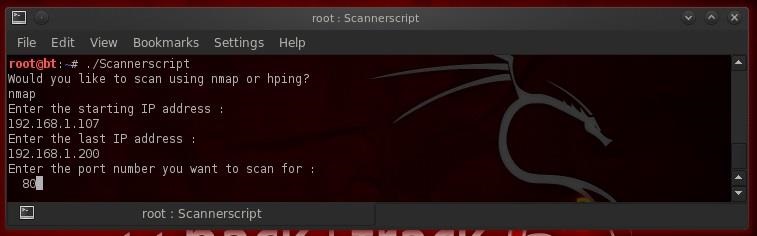
To run this script and see whether it works, let's first re-save it as Scannerscript. Now let's open a terminal and run it by typing;
  • ./Scannerscript
As you can see, when I asked it to run the nmap scan, it did just that.
Now, comes the critical part. Let's ask our Scannerscript to run an hping scan. To do so, it will have to check to see whether the user requested a nmap or hping scan, and if an hping scan, skip over the nmap section of our code and go directly to the hping section. This utilizes our conditional statement. Let's give it a try.
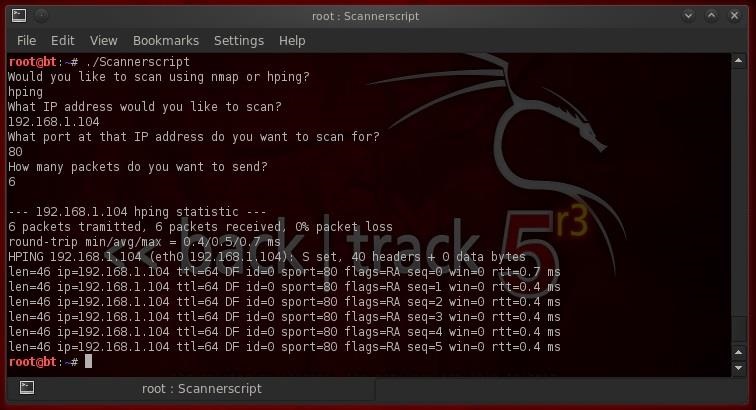
Success! Our script enabled the user to select either a nmap or a hping scan by using the conditional if...then...else!

Add To Google BookmarksStumble ThisFav This With TechnoratiAdd To Del.icio.usDigg ThisAdd To RedditTwit ThisAdd To FacebookAdd To Yahoo

Wednesday, May 15, 2013

Ettercap in Bridged Mode


Ettercap has been around for ages. It's currently on version 0.7.4.1, is available at: http://ettercap.sourceforge.net, and is included in Backtrack. For those of you who have no idea what Ettercap is, or what a packet sniffing program is, just think wiretapping. There's a lot more to it than just putting a tape recorder inside an analog phone, but the general idea is close.
In their own words:
Ettercap is a comprehensive suite for man in the middle attacks. It features sniffing of live connections, content filtering on the fly and many other interesting tricks. It supports active and passive dissection of many protocols and includes many features for network and host analysis.
There are a ton of websites out there which purport to give tutorials on how to use Ettercap. Go ahead and find them, and read them. Or better yet, run:
# ettercap -h
# man ettercap
# info ettercap
because basically, most of the sites I could find are just a regurgitation of Ettercap's own manual.

Be very careful when learning about, and using Ettercap. Even if you do it right, you can screw up the performance on a large network. If you do it wrong, you can DOS the whole subnet, and even adjacent subnets on other switches.

Ettercap is capable of operating in bridged mode, which is almost invisible. The monitoring is physically in between A and B, and all traffic passes through the bridge freely, meaning no ARP poisoning or other active attack is required.
The command to run Ettercap in bridged mode is quite simple:
# ettercap -Tq -i eth0 -B eth1
However, when running this, I was getting an error 99, cannot assign address, about IP addresses not being assigned. I came across an article with the answer to this problem. In addition, it also suggested making your own bridge, and then running Ettercap on the bridge you just made instead of relying on Ettercap's bridge mode code.
# brctl addbr mitm-bridge
# brctl addif mitm-bridge eth0
# brctl addif mitm-bridge eth1
# ifconfig eth0 0.0.0.0 up
# ifconfig eth1 0.0.0.0 up
# ifconfig mitm-bridge <GATEWAYIP> up
Turn on IP forwarding:
# echo 1 > /proc/sys/net/ipv4/ip_forward
Start sniffing:
# ettercap -Tq -i mitm-bridge
Now unplug the nic of the Target, and move the cable to eth0 of the Monitor machine. Then connect eth1 of the Monitor to the nic of the Target. The Target machine should have no idea what just happened, apart from a brief network disconnection. The Monitor machine should now be able to pick up all traffic to and from the Target machine.

Add To Google BookmarksStumble ThisFav This With TechnoratiAdd To Del.icio.usDigg ThisAdd To RedditTwit ThisAdd To FacebookAdd To Yahoo

Tuesday, May 14, 2013

ARP POISIONING + MITM ATTACK


Today i would like to share a simple / old / educational method of sniffing passwords on a LAN ( Local Area Network).
There are quite a few ways and tools out there designed to do this but to keep things simple and basic, we will be using ettercap from Backtrack 5.
Below i will show you a basic method to use ettercap and perform an arp poisoning/Mitm attack on a LAN. This will allow you to sniff HTTP, FTP, TELNET, POP usernames and passwords.

Updating Ettercap :
1) Open terminal and type “sudo apt-get update” and wait for it to finish loading.
2) Next type “apt-get install ettercap”
3) Lastly, type “apt-get install ettercap-gtk

Preparation :
1) On a terminal and type “locate etter.conf” and you will be presented with a similar screen as shown below.
http://zyphyto1.host56.com/ettercap/1.png

2) Next type, “nano /etc/etter.conf”.
http://zyphyto1.host56.com/ettercap/snapshotnanoetterconf.png

3) Ok so now to give ettercap root privileges we will have to change the ec_uid & ec_gid to a value of 0. So the final outcome would be :
http://zyphyto1.host56.com/ettercap/2.png
ec_uid = 0 # nobody is the default
ec_gid = 0 # nobody is the default

4) Scroll right down to the Linux column. And unhash the two lines shown below.
http://zyphyto1.host56.com/ettercap/3.png
#---------------
#     Linux Before Mdofication
#---------------

# if you use ipchains:
   #redir_command_on = "ipchains -A input -i %iface -p tcp -s 0/0 -d 0/0 %port -j REDIRECT %rport"
   #redir_command_off = "ipchains -D input -i %iface -p tcp -s 0/0 -d 0/0 %port -j REDIRECT %rport"

# if you use iptables:
   #redir_command_on = "iptables -t nat -A PREROUTING -i %iface -p tcp --dport %port -j REDIRECT --to-port %rport"
   #redir_command_off = "iptables -t nat -D PREROUTING -i %iface -p tcp --dport %port -j REDIRECT --to-port %rport"


#---------------
#     Linux after Modification
#---------------

# if you use ipchains:
   #redir_command_on = "ipchains -A input -i %iface -p tcp -s 0/0 -d 0/0 %port -j REDIRECT %rport"
   #redir_command_off = "ipchains -D input -i %iface -p tcp -s 0/0 -d 0/0 %port -j REDIRECT %rport"

# if you use iptables:
   redir_command_on = "iptables -t nat -A PREROUTING -i %iface -p tcp --dport %port -j REDIRECT --to-port %rport"
   redir_command_off = "iptables -t nat -D PREROUTING -i %iface -p tcp --dport %port -j REDIRECT --to-port %rport"
5) Once you have completed and checked your modifications. CLick Ctrl-X (to exit), then press Y (Yes to save) and lastly press the Enter key.
6) Type in “Clear” to clear up your messy terminal. Cleanliness is next to Godliness. Congratulations, we are done with the boring stuff.

Lets Begin :
1) Open up a terminal and type ettercap -G.
http://zyphyto1.host56.com/ettercap/ETtercap-g.png

2) On the new GUI that appears, click Sniff –> Unified Sniffing.
http://zyphyto1.host56.com/ettercap/choosesniff.png

3) Now go to “Hosts” and click on “Scan for hosts”.
http://zyphyto1.host56.com/ettercap/choosehost.png

4) Next you will be prompted for your Network Interface. Choose your interface and press the Enter key.
http://zyphyto1.host56.com/ettercap/networkinterface.png

5) You will ettercap scans the whole netmask for 255 hosts and present you with a little message like this :
Randomizing 255 hosts for scanning…
Scanning the whole netmask for 255 hosts…
1 hosts added to the hosts list…

6) Now on the ettercap GUI click on Start –> Start Sniffing.
http://zyphyto1.host56.com/ettercap/startsniffing.png

7) Click on MitM –> Arp Poisoning.
http://zyphyto1.host56.com/ettercap/mitm.png

8) When the prompt screen appears, tick on Sniff Remote Connections and click OK.
http://zyphyto1.host56.com/ettercap/sniffremoteconnections.png

9) Now lets sit back and wait for activity in the server!
2.5 mins later…………..Voila! It shows we have username and password of hotmail.com, twoo.com, eurospot.com.
http://zyphyto1.host56.com/ettercap/snapshot5.png

10) When you are done, click Start –>Stop Sniffing & stop MITM attack. You will notice the command ‘Re-Arping’on the bottom of your GUI. This means it is fixing up the network to make it like it was before.

Authors Note :
1) Ettercap takes a little tweaking on different systems to get it going smoothly, so if this method does not work for you. Just mess around with it, through mistakes you will learn more :P
2) This tutorial was intended to explain mass network sniffing as i had no victims at hand.
3) This is for educational purposes, please do not harm the innocent.

Add To Google BookmarksStumble ThisFav This With TechnoratiAdd To Del.icio.usDigg ThisAdd To RedditTwit ThisAdd To FacebookAdd To Yahoo

Sunday, May 12, 2013

How to Change Screen Resolution In Backtrack 5R3


Finally I finished downloading this O.S :-) but I have a problem How To Change Screen Resolution in Backtrack 5. The step below is how to solve the prob
The first thing I check for the new Linux O.S run virtually is the Screen Resolution. The most common thing you do when you want to change screen resolution is go to /etc/X11/xorg.conf. But in this Backtrack 5 you will find nothing

Step by Step How To Change Screen Resolution in Backtrack 5:

1. Open your terminal (CTRL + ALT + T)
2. Choose your favorite text editor (I prefer to use pico) and then open /usr/share/xresprobe/xorg.conf
How To Change Screen Resolution in Backtrack 5

How To Change Screen Resolution in Backtrack 5
3. in the picture above, there’s line says Modes "1024×768" , just change the 1024×768 to your desired screenresolution.
You should remember that if you change the value, you should change all of the entire Mode value to your desiredscreen resolution.
When you finish, press CTRL+O (to save) and then CTRL+X (to exit pico).
4. The next step is you need to log out by clicking the human logo at top right of your screen
How To Change Screen Resolution in Backtrack 5
5. To get into your X just type startx from your shell.
6. Your screen now should be change to the new resolution.
Hope this helps you :-)

UPDATES (Works 100%):

1. On VirtualBox, click VirtualBox Guest Additions.

2. Run 
#/media/VBOXADDITIONS_BLAH_BLAH_XX/VBoxLinuxAdditions.run

3. Do the from step 2 above tutorials(change your /usr/share/xresprobe/xorg.conf)
4. Reboot your Machine
Hope you enjoyed it 

OR

Configuring the screen resolution to custom value in Ubuntu was a big headache to me. With most of the monitors I was not able to change the resolution to something of my choice, apart from what is listed in the Display settings. Then I found the following way.
   sudo xrandr --newmode "1600x900_60.00"  118.25  1600 1696 1856 2112  900 903 908 934 -hsync +vsync
   sudo xrandr --addmode VBOX0 "1600x900_60.00"
   sudo xrandr --output VBOX0 --mode "1600x900_60.00"

First command creates a new mode with resolution 1600x900
Second command makes it available for use, with display (in this case VBOX0)
Third command selects the newly added mode as the display resolution for the specified display

To change this to any custom resolution, just replace 1600 with the width you want and 900 with the height you want. Thats it. Enjoy :)


OR

in a console, type:

xrandr -s 1024x768


replace 1024x768 with the resolution you need.


Add To Google BookmarksStumble ThisFav This With TechnoratiAdd To Del.icio.usDigg ThisAdd To RedditTwit ThisAdd To FacebookAdd To Yahoo

How to Install VMware Tools in BackTrack 5R3


NOTE: Our GNOME VMware image of BackTrack has VMware Tools installed by default.

Backtrack 5 R2 & R3

NOTE: KDE Users, please run the following command before installing VMWare tools on BackTrack 5 R2: 
root@bt:~# mkdir /etc/cups/ppd

For google's sake, here's the error you get if you do not create that directory, on a BT5 R2 / R3 KDE install:
Unable to create symlink "/etc/cups/ppd/VMware_Virtual_Printer.ppd" pointing to file "/usr/lib/vmware-tools/configurator/thinprint.ppd".

  • On an upgraded or freshly installed BackTrack 5 R2 / R3:

root@bt:~# prepare-kernel-sources

  • Next on the VMware Player, we click Virtual Machine -> Install VMware Tools.
  • Now let's quickly setup the VMware Tools by issuing the following commands:

root@bt:~# mkdir /mnt/cdrom; mount /dev/cdrom  /mnt/cdrom
root@bt:~# cp /mnt/cdrom/VMwareTools-<version>.tar.gz /tmp/
root@bt:~# cd /tmp/
root@bt:~# tar zxpf VMwareTools-<version>.tar.gz 
root@bt:~# cd vmware-tools-distrib/
root@bt:~# ./vmware-install.pl 

NOTE: After this a series of questions will come, if you are unsure about them just leave them default. At the time of this posting, the VMWare tools do not compile cleanly with kernel 3.2.6. In particular, the vmxnet driver fails to compile. However, the BackTrack 3.2.6 kernel already has a native vmxnet driver, so there should be no overall loss of performance.

Backtrack 5 R1

  • In case you need to manually install the VMware Tools you first have to prepare your kernel source by issuing the following commands:

root@bt:~# ln -s /usr/src/linux /lib/modules/2.6.39.4/build

  • Next on the VMware Player, we click Virtual Machine -> Install VMware Tools.
  • Now let's quickly setup the VMware Tools by issuing the following commands:

root@bt:~# mkdir /mnt/cdrom; mount /dev/cdrom  /mnt/cdrom
root@bt:~# cp /mnt/cdrom/VMwareTools-<version>.tar.gz /tmp/
root@bt:~# cd /tmp/
root@bt:~# tar zxpf VMwareTools-<version>.tar.gz 
root@bt:~# cd vmware-tools-distrib/
root@bt:~# ./vmware-install.pl 

NOTE: After this a series of questions will come, if you are unsure about them just leave them default.
WHEN ASKED IF YOU WANT THE SCRIPT TO RUN VMWARE-CONFIG-TOOLS.PL FOR YOU, SAY NO!
  • We now need to apply some patches to the VMWare kernel module sources before they are built. So:
Before running VMware Tools for the first time, you need to configure it by 
invoking the following command: "/usr/bin/vmware-config-tools.pl". Do you want 
this program to invoke the command for you now? [yes] no
  • Now we apply the vmware-tools 2.6.39 patch:
root@bt:~# cd /usr/lib/vmware-tools/modules/source/
root@bt:~# for file in *.tar;do tar xpf $file;done
root@bt:~# rm *.tar
root@bt:~# wget www.backtrack-linux.org/vmtools2639.patch
root@bt:~# patch -p1 < vmtools2639.patch 
root@bt:~# for dir in $(ls -l |grep only|awk -F" " '{print $8}' |cut -d"-" -f1);do tar cvf $dir.tar $dir-only;rm -rf $dir-only;done
root@bt:~# vmware-config-tools.pl 
  • If running in Mac Fusion, the patch won't apply cleanly. Accept the defaults and continue.
  • Continue with the installation to the end, and hopefully all the VMWare modules should compile!
  • bring back your pretty console and reboot:
root@bt:~# fix-splash
root@bt:~# shutdown -r 0

Backtrack 5

  • In case you need to manually install the VMware Tools you first have to prepare your kernel source by issuing the following commands:

root@bt:~# prepare-kernel-sources
root@bt:~# cd /usr/src/linux
root@bt:~# cp -rf include/generated/* include/linux/

  • Next on the VMware Player, we click Virtual Machine -> Install VMware Tools, this will mount a CD containing an archive.
  • Now let's quickly setup the VMware Tools by issuing the following commands:

root@bt:~# cp -f /media/VMware\ Tools/VMwareTools-8.4.6-385536.tar.gz /root/
root@bt:~# tar xvfz VMwareTools-8.4.6-385536.tar.gz
root@bt:~# cd vmware-tools-distrib/
root@bt:~/vmware-tools-distrib# ./vmware-install.pl

NOTE: After this a series of questions will come, if you are unsure about them just leave them default.
In which directory do you want to install the binary files?
[/usr/bin] [RETURN]

............ 
............

The configuration of VMware Tools 8.4.6 build-385536 for Linux for this running
kernel completed successfully.

You must restart your X session before any mouse or graphics changes take
effect.

You can now run VMware Tools by invoking "/usr/bin/vmware-toolbox-cmd" from the
command line or by invoking "/usr/bin/vmware-toolbox" from the command line
during an X server session.

To enable advanced X features (e.g., guest resolution fit, drag and drop, and
file and text copy/paste), you will need to do one (or more) of the following:
1. Manually start /usr/bin/vmware-user
2. Log out and log back into your desktop session; and,
3. Restart your X session.

To use the vmxnet driver, restart networking using the following commands:
/etc/init.d/networking stop
rmmod pcnet32
rmmod vmxnet
modprobe vmxnet
/etc/init.d/networking start

Enjoy,

--the VMware team

Found VMware Tools CDROM mounted at /media/VMware Tools. Ejecting device
/dev/sr0 ...

  • If you see the message above in the terminal that means that the installation was successful, now after a quick reboot the VMware Tools should be working, also let's not forget to fix the Splash screen.
root@bt:~# fix-splash
root@bt:~# shutdown -r 0


Add To Google BookmarksStumble ThisFav This With TechnoratiAdd To Del.icio.usDigg ThisAdd To RedditTwit ThisAdd To FacebookAdd To Yahoo

How to install vmware tools in backtrack 5R3

This is only for KDE.
root@bt:~# mkdir /etc/cups/ppd
Prepare Kernels  Source 
 root@bt:~#prepare-kernel-sources
Change Root password of backtrack 5 R3 installation 
root@bt:~#passwd root 
Enter New UNIX Password : 
Retype New UNIX Password : 
passwd : Password Updated Successfully
After Prepare kernel sources now , Install vmware tools
1 : Eject and Disconnect Backtrack if its still mounted
2 : click on vm and choose install vmware tools
3 : if  mount automatically then its okay else mount manually
root@bt:~#mkdir /mnt/vmtools
root@bt:~#mount /dev/cdrom /mnt/vmtools/
mount : block device /dev/sr0 is write-protected, mounting read-only
root@bt:~#cp /mnt/vmtools/VMwareTools-8.8.4-743747tar.gz /tmp
root@bt:~#cd /tmp
root@bt:/tmp#tar zxpf VMwareTools-8.8.4-743747tar.gz
root@bt:/tmp#cd vmware-tools-distrib/
root@bt:/vmware-tools-distrib/#perl ./vmware-install.pl
it will ask many question if you are not sure just go with defaults and when it finish installing simply type
fix-splash
root@bt:fix-splash
root@bt:reboot

Add To Google BookmarksStumble ThisFav This With TechnoratiAdd To Del.icio.usDigg ThisAdd To RedditTwit ThisAdd To FacebookAdd To Yahoo