Search This Blog

Showing posts with label Wi-FI Hacking. Show all posts

Sunday, June 26, 2016

Create a Free Home Wireless Hotspot With Login Page

What is an internet hotspot? Most people with even a small amount of technical knowledge will be able to answer that question in this day and age. An internet hotspot is simply a broadband/fibre connection that offers wireless internet access, and they are literally everywhere these days. Many shops/shopping centers, food and drink outlets, hotels and various other businesses/industries offer free or paid internet access via a hotspot. Even ISPs sometimes offer nationwide hotspots as an inclusive or optional part of your internet package.
Creating a hotspot on your computer is actually quite easy but with an ordinary hotspot your protection consists only of the WEP or WPA WiFi key, you have to tell everyone the key to give them access. If you want to refuse someone access, the wireless key needs to be changed and a new one resent to those other users who still are allowed to connect. Have you ever wondered how to create a login page on your hotspot like businesses and commercial services do? This way everyone will be able to connect to the hotspot but when they try to browse the web, they’ll be presented with a page that requires a username and password login before the wireless internet can be used.
There are various methods to create wireless hotspots that incorporate a login page (also known as a captive portal) but many of them are complicated to set up. Some require you to use Linux, others need extra access points connected via a second LAN adapter. You can also use specialized routers for this task or use a router that has a customized firmware but not everyone can use this method. There used to be a Windows application called 2Hotspot which made it very easy to create a login page for your hotspot, sadly that project died many years ago.login to a hotspot captive portal
In this article we’re going to show you how you can easily create a wireless hotspot with a login page, but the great thing is you need nothing special apart from a WiFi enabled PC or laptop and and a wired/wireless connection to the internet! It does require 2 pieces of free software installed on your computer but needs no special networking knowledge to setup. The guide below is for Windows Vista, 7 and 8 only, it’s not really a good idea to use a hotspot like this on Windows XP because it will be more vulnerable to exploits after support ends in April 2014.

Installing A Hotspot Onto Your Computer

This first step is needed to turn your computer into a wireless hotspot that the other computers on the network will connect to. It basically takes the place of a hardware access point meaning you don’t need to use any extra hardware. Other hotspot creation software may work but we found this program the easiest to setup and use.
1. Download WiFi Creator  and then install it.
2. Launch WiFi Creator and making sure Automatic configuration is selected, either leave the settings at default for now or give the hotspot a new name and a new 8 character or more password. Then select the network adapter that connects to the internet from the dropdown, this can be either a wireless or wired adapter.
Create hotspot with wifi creator
3. Click “Set up and Start Hotspot”. A new virtual network adapter will be created using the Microsoft Virtual WiFi Miniport Adapter and and the adapter that connects to the internet will now be set up to share the internet with the new connection.
new virtual hotspot adapter created
If you didn’t want to actually setup a login page, you could stop here and give users the network key entered into WiFi Creator, although that obviously defeats the object of the article. Do note that WiFi Creator uses WPA2-PSK WiFi encryption which some older wireless adapters might not work with.

Installing Software To Create A Login Page

Setting up an additional login page requires the software to sit in between the adapter that acts as the access point and the adapter that accesses the internet to intercept web traffic and redirect to the login page before allowing access. There are very few free Windows applications that can do this without the need of external access points or extra hardware, here are the quick setup guides for three applications that can do the job, each has its own plus and minus points.
ARPMiner
What makes ARPMiner useful is the fact it’s very easy to configure while offering enough to get a simple login page up and running. There are more advanced options such as RADIUS accounting but they are only available in the paid versions which start at $220.
1. Download ARPMiner  and then install it. After installation, launch ARPMiner making sure the WiFi Creator hotspot is already running. You need to make sure TekpSpot.exe is allowed in your firewall from the ARPMiner Program Files folder which is the proxy/DNS service used. Or for testing, temporarily disable your firewall.
2. Go to the Users tab and create a new hotspot user. In the boxes at the bottom enter a name, password and session duration in seconds. Although the user will get logged out after the time is reached, they can simply log back in, so the timer will not block expired users. Press Add/Update to add the user to the system.
setup user in arpminer
3. Click on the Settings tab then click NAT underneath. This sets up the Internet Connection Sharing which was done by WiFi Creator earlier, but if ARPMiner tries to set things up differently, it won’t work. Make sure the adapter which connects directly to the internet is set as the Public Network and the Virtual WiFi Miniport adapter created by the hotspot program is the Private Network. Click Save and then click the Start button icon to start the ARPMiner service.
arpminer setup for internet connection sharing
4. Now go to a computer you want to connect up to the network and look for the hotspot you created earlier, then connect to it, the default SSID is “MyHotspot” and the default pass is “12345678”. You can also of course connect to the hotspot from other internet enabled devices like smartphones and tablets.
connect to myhotspot
5. Now open a webpage in a web browser and you should be redirected to the ARPMiner login page instead, where any credentials can be entered that were created in the Users tab in step #2.
arpminer login page
6. After pressing Login you’ll be redirected to the Session Information page which will tell how long the session lasts and when it was created. The web can now be browsed until the time runs out when you will be asked to login again.
arpminer session information
The state of user sessions can be viewed from the Sessions tab in ARPMiner where you can see the MAC/IP address, which username is in use and when the current session expires. To disable the login box simply use the Stop button in the Settings tab. Custom login pages can be created if you know html and a file called login.html needs placing in the ARPMiner Program Files folder, read the docs for more details.
Microsolut
Microsolut has a huge array of functions and incorporates a full hotspot billing system if you want to go down that route. One major drawback is the free version only allows 2 concurrent users online which may be an issue if you plan on making your hotspot system support several users browsing at the same time.
1. Download Microsolut  and install using the default options, it will take a while. Make sure your WiFi Creator hotspot is up and running.
2. Launch the program and when the login popup appears, simply press Login. The username and password for the server can be re-configured later.
3. Click Setup -> Web server on the left menu and in the IP Address drop down in the Web server tab select the “192.168.137.1” address and click Save.
microsolut set webserver address
4. Go go Connections -> Monitor and in the Adapter name drop down, select the adapter that was created by the WiFi Creator hotspot software. In our case it’s “Wireless Network Connection 4”, you can check the name in the Network and Sharing Center. Click Save.
microsolut set adapter
5. To quickly test your hotspot, click Start Hotspot and if a Firewall popup appears, click to allow it. Go to General -> Accounts, a TEST user is already configured which users of your network can freely access for up to 5 minutes to quickly try out. The options for the TEST user are outdated though and need changing. Click TEST and then Modify, then enter a positive number in the “Expire in” box. Untick Print Ticket and press Save.
edit test user configuration
6. Using a device which is to connect to the hotspot, find the WiFi connection like in ARPMiner step #4. Open a webpage in the web browser and you should be greeted by the login page which is setup to accept the TEST user, tick the box to accept the terms and click Go. A Welcome window will show the limits of the account and then you’re ready to browse for around 5 minutes before the account expires. Unlike ARPMiner, this 5 minute usage is MAC address controlled and you can’t get another 5 minutes until the MAC is cleared from the Test Access settings window.
microsolut hotspot login page
Although we’re simply showing you here how to configure Microsolut to work as a simple hotspot, there are tons of extra options such as creating a completely custom login page, speed/bandwidth/time limiting, setting up computers and websites to either give users free access or no access at all, URL filter to block keywords such as adult/illegal content, and a comprehensive payment system. If 2 concurrent users are not enough, paid options start at €39 to increase that to 15 users.
MyHotSpot
MyHotSpot is by the same developer as WiFi Creator we are using to create the virtual access point, and is perhaps the most complicated to setup because it’s geared squarely at being used as a full payment system. But with time and patience, it’s also a very powerful and effective program, and best of all, it’s freeware!
1. Download MyHotSpot  and install it, a reboot is required. Make sure your WiFi hotspot is running after the restart.
2. Launch the program and at the Network Configuration window, make sure Automatic is selected and choose the adapter that connects to the internet at the top drop down menu and the hotspot below. Click Next.
myhotspot ics network config
3. Enter a city and country at the next window and when asked to enter a username and password, simply click Login.
4. Here, we’re going to enable a simple test login to verify the connection works. Click on the Edit menu -> Hotspot Configuration -> Access, then click the blue Advanced setting button. Tick “Enable guest-login”, adding a password is optional, click Close.
enable myhotspot guest login
5. Like the previous hotspot software you need to now go to a device which can connect to the hotspot, such as another computer or tablet, connect to it (remember the default is “MyHotspot” and “12345678”), and then try to open a webpage. You should be greeted with the MyHotspot default login page…
login to myhotspot portal page
6. Simply type in username “guest” and a password if you entered one and click to login. If you have set things up correctly, a success window will appear.
user login success
There are more advanced settings to tweak the access rights as well as options to edit and design the login page, setup free access URLs which appear on the right of the login window, MAC address whitelisting to bypass login and SMS authentication. There’s also a simple Firewall which can block file sharing by default and the Web Filter is preconfigured to block well over 100 social networks, the user will receive a “BLOCKED” page in their browser if it’s enabled.
Unfortunately, MyHotSpot is setup to work with tariffs and payments which is fine if that’s what you want, more problematic if you just want to use access logins for time or bandwidth usage. What you will need to do is go to Edit -> “Tariffs and Security” and set all tariff rate options to zero money and then create a user from there. Once set correctly, it does work quite well. The icons down the left of the main window will show the log and information about who’s connected and duration/traffic used.

Read More:https://www.raymond.cc/blog/create-a-wireless-internet-hotspot-at-home-in-10-minutes-for-free/


Add To Google BookmarksStumble ThisFav This With TechnoratiAdd To Del.icio.usDigg ThisAdd To RedditTwit ThisAdd To FacebookAdd To Yahoo

Wednesday, June 10, 2015

Hack Like a Pro: How to Crack Passwords, Part 2 Cracking Strategy

hello friends very often hackers new to password cracking are looking for a single tool or technique to crack passwords, but unfortunately, that does not exist. That's fortunate for network security, though. Each type of password requires a unique strategy tailored to the situation. The situation can be the type of encryption (MD5, SHA1, NTLM, etc.), remote vs. offline, salted or unsalted, an so on. Your password cracking strategy must be specific to the situation.
In this tutorial, I want to discuss password cracking strategy. Many newbie password crackers simply run their password cracking tool and expect a breakthrough. They run huge wordlists and hope for the best. If it doesn't crack the password, they are lost. Here I want to develop a multi-iteration strategy for password cracking that will work on the vast majority of passwords, though not all. No strategy will work on all passwords with the exception of the CPU and time-intensive brute force cracking.

Developing a Password-Cracking Strategy

I'm assuming here that we are after more than a single password. Generally, password cracking is an exercise of first capturing the hashes. In Windows systems, these are in the SAM file on local systems, LDAP in active directory systems, and /etc/shadow on Linux and UNIX systems. These hashes are one-way encryption that are unique for every password input (well, nearly every password input, to be precisely accurate). In each case, we need to know what encryption scheme is being used in order to crack the hash.
For instance, Linux and Unix systems use MD5 and modern Windows systems use HMAC-MD5. Other systems may use SHA1, MD4, NTLM, etc. Make certain you know what hash is being used on the system you are trying to crack, otherwise you will spend hours or days without satisfactory results.
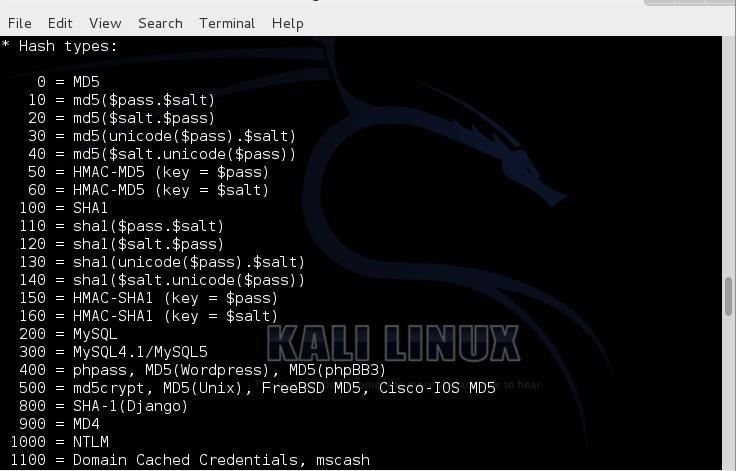
All that having been said, John the Ripper has an automatic hash detector that is correct about 90% of the time, but when it is wrong, there is no way to know. In Cain and Abel as well as hashcat, we must tell the tool what type of hash we are trying to crack.
Here we can see a screenshot of the types of hashes that we can crack using hashcat and their numeric values.

Step 1: Brute Force Short Passwords

Although it might seem contrary to common sense, I often start by trying to brute force very short passwords. Although brute force of long passwords can be very time consuming (days or weeks), very short passwords can be brute forced in a matter of minutes.
I start by trying to brute force passwords of six characters or less. Depending upon my hardware, this can usually be accomplished in a matter of minutes or hours. In many environments, this will yield at least a few passwords.
In addition, I will also try to brute force all numeric passwords at this stage. Number passwords are the easiest to crack. An 8-character numeric password only requires that we try 100 million possibilities, and even a 12-character number password only requires 1 trillion possibilities. With powerful hardware, we can do this with barely breaking a sweat.
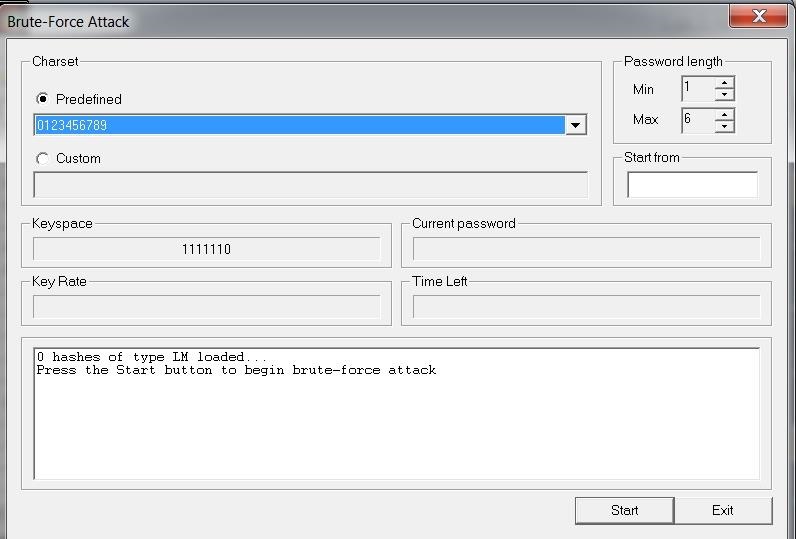
Here we have configured Cain and Abel to brute force 6-character passwords that are only numbers.

Step 2: Low-Hanging Fruit

Once we broken a few short passwords by brute force, we will still likely have a file that has many, many hashes in it. If we trying to compromise an institutional or corporate network, we usually only need to crack a single password to begin the network compromise.
Although the user whose password is cracked may have limited rights and privileges, there are many ways to escalate privileges to sysadmin or root. This means that if we can crack a single password on a network, we can likely take down the entire network.
All of the above having been said, let's next go after any low-hanging fruit. That means let's go next after those passwords that are easiest to crack. For instance, if we now the institution has a password policy that all passwords must be 8 characters, many people will make their passwords the absolute minimum.
To attempt a quick and dirty pass on these hashes, simply chose a list of dictionary words that are eight characters. Running through the millions of words in such a list will generally only take only a few hours and is likely to yield a significant portion of the passwords.

Step 3: Try Common Passwords

Human beings, although we think we unique, tend to think and act similarly. Just like pack animals, we follow the herd and act similarly. The same can be said for passwords.
Users want a password that fulfills their organizations minimum password policy, but also is easy to remember. That's why you will see passwords, such as "P@ssw0rD" so often. Despite its obvious simplicity, it fulfills a password policy of minimum of 8 characters, uppercase and lowercase letters, a special character, and a number. Believe it or not, this password and its variations are used numerous times.
Knowing that humans tend to use these types of passwords, in my next iteration on the password hash list, I will try a password list of commonly found passwords. Numerous sites on the web include wordlists of cracked or captured passwords. In addition, you might try scraping the web to capture as many passwords as possible.

Step 4: Combine Words with Numbers

Running through the low-hanging fruit in Step #2 and common passwords on Step #3 will likely yield at least a few passwords and the time it consumes is minimal. Now we want to attack the remaining hashes and take the next step in complexity.
In this iteration, we will run the remaining hashes through a wordlist that has longer dictionary words and dictionary words with numbers. Users, because they are forced to change passwords periodically, will often just add numbers to the beginning or end of their passwords. Some of our password cracking tools like hashcat and John the Ripper allow us to use rules to apply to wordlist to combine words, append and prepend numbers, change case, etc.

Step 5: Hybrid Attack

By now we have usually cracked over 50% of the passwords in Steps #1 through #4, but we have the harder work ahead to crack the more intransigent passwords. These passwords will often include special characters and combined words.
These would include such passwords as "socc3rmom" and "n3xtb1gth1ng". These are relatively strong passwords including special characters and numbers, but because they include variations on dictionary words they are often easily crackable.
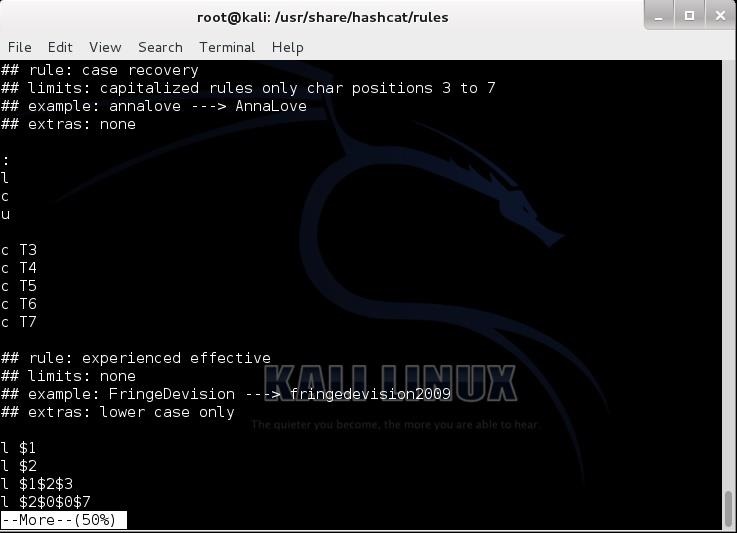
Next, we need a password list that combines dictionary words with numbers and special characters. Fortunately, this is something that John the Ripper does automatically, but other password crackers (Cain and Abel) don't necessarily. Hashcat can be run with one of its many rule sets to combine words and special characters to your wordlist.
In this screenshot, we can see the combinator rule in hashcat that adds upper case characters to combined words.

Step 6: Finally, if All Else Fails...

If all else fails, you are left to brute force the passwords. This can very slow with a single CPU, but can speeded up 1000x or more with a botnet, a password cracking ASIC, or a very fast multiple GPU password cracker (I'll be doing tutorials on each of these in the near future). Among the fastest of these, a 25 GPU password cracker is capable of 348 billion hashes per second!
Even when we are left with a brute force attack, we can be strategic about it. For instance, if we know that the password policy is a minimum of 8 characters, try brute forcing with just eight characters. It will save you time and likely yield some passwords.
In addition, you can choose your character set. Once again, if we know that the password policy is uppercase, lowercase, and a number, choose only those character sets to brute force.
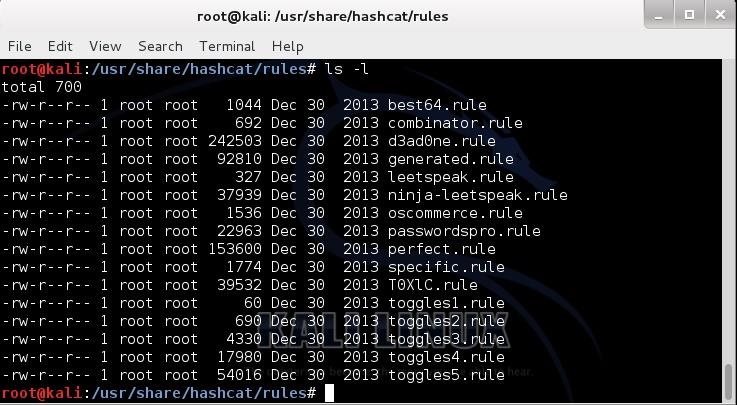
Finally, some password crackers like hashcat (look for my upcoming tutorial on hashcat) have built-in "policies" that you can choose to attempt the brute force. These are similar to strategies and help by shaping your attacks based on the password-construction protocol followed by a company or group.
These rules can be used in other password cracking tools such John the Ripper. Here we can see a listing of these rules in hashcat (these can be used in John the Ripper, as well).
It is important to be successful at password cracking that you follow a systematic strategy, no matter what tool you are using, that requires multiple iterations to crack the most passwords. This strategy generally works from the passwords that are easiest to crack to the most difficult.
Of course, this strategy will in part be dependent upon the tools you are using, the wordlists that you use, and the password policy of the victim. Although, I have laid out here my password cracking strategy, yours may be different and need to be adapted to the environment your are working in.

Add To Google BookmarksStumble ThisFav This With TechnoratiAdd To Del.icio.usDigg ThisAdd To RedditTwit ThisAdd To FacebookAdd To Yahoo

How to Crack WPA2 and WPA WiFi Password – Step by step

A Complete Guide

This tutorial will show you how to crack WPA2 and WPA secured wireless networks. Please note that this is not the Reaver attack.
The process is done by airmon-ng suite. Many steps are same for WEP cracking and WPA/WPA2 as well.

 NOTE: This tutorial is for Educational Purposes Only!
What You’ll Need
For this you will require all the basic things like a computer, spare time, etc. But important things are as follows:
  • BackTrack OS. Backtrack is a bootable Linux distribution with lots of pen-testing tools and is almost needed for all my tutorials. So, if you have not installed it please read this article on how to install it.
  • A compatible wireless network adapter. If you are live booting BackTrack then the internal adapter will work but I recommend an external wireless adapter.
Let’s Get Started
Step 1:Boot into BackTrack
You can use any method to boot into backtrack; like from live cd, VMware, dual boot, etc. So, just boot it first into the GUI mode and open up a new console(command line) which is in the taskbar.
Step 2: Gather Information
Before launching the attack you need to know about your wireless network interface name, make your wireless card is in monitor mode. Then get the BSSID ( it is the series of unique letters and number of a particular router) of the access point. So let us do all these things.
First lets find your wireless card. Inside terminal or console, type:
airmon-ng
Press Enter and there you should see a list of interface names of different devices. There should be a wireless device in that list you you have connected it to BackTrack. Probably it may be wlan0 or wlan1.

rack WPA2 and WPA WiFi password
hack WPA2 and WPA WiFi password
Enable monitor mode. Supposing your wireless card interface name as wlan0, type this command in that same console.
airmon-ng start wlan0
This code will create a new monitor mode interface mon0 like in the screenshot below which you want to keep note of.

rack WPA2 and WPA WiFi password
hack WPA2 and WPA WiFi password
Search the BSSID and channel of the Access Point (router) you want to crack. Now let us find the information. For this type the following and press Enter
airodump-ng mon0

rack WPA2 and WPA WiFi password
hack WPA2 and WPA WiFi password
Then you will see a list of Wireless Networks available around you and please keep note of the BSSID and channel of the ESSID (wireless network) you want to crack. Please note that the less the number is in the PWR column the close you are to the router; example mine is (-42) which means i am quite near to the router. When you find it hit CTrl+C to stop it scanning and enter the following:
airodump-ng --bssid (AP BSSID address) -c (chaneel no) -w (file name you want to save with) (monitor interface
So, in my case it will be
airodump-ng --bssid 54:E6:FC:E0:AC:FC -c 1 -w WPAcrack mon0
Then the screen will look like this:

rack WPA2 and WPA WiFi password
hack WPA2 and WPA WiFi password

rack WPA2 and WPA WiFi password
hack WPA2 and WPA WiFi password
Step 3: Let’s Get Cracking
Now, its time to capture a 4-way handshake so that we can use it to get the plain password of the network. Here is a little tricky part, if there is a client connected to the network then there will a mac address listed in the “station column” like in the screenshot below and if not then you will have to wait for someone to connect it to get 4-way handshake.You will get the handshake if anyone tries to connect to that network.
But, if there is someone is connected on the network then you can deauthenticate him so that he will try to reconnect and you will be able to get the handshake. To deauthenticate him enter the following code in new console. But, before take note of the Mac Address of the station.
aireplay-ng -a (BSSID of the network) -c (MAC address of the client) -0 20 (for deauntheticate "20" for no of packets to send) (monitor interface)
You can send any no of packets but few packets would be enough. In the image I have send 0 packets which is unlimited but it is better you send few packets and only and if you don’t get the handshake you can hit Ctrl+C to stop the process and redo it again.
aireplay-ng -a 54:E6:FC:E0:AC:FC -c 9C:4E:36:4E:F5:F0 -0 20 mon0
hack WPA2 and WPA WiFi password
Now it will send deauthentication packet and if you are close to the network and if everything goes right then he will get disconnected and will try to connect again and we will get the 4-way handshake file in the top right corner of the airodump screen as shown below. But, the client should also be physically close to your wireless adapter network range so that it can deaunthecate them.
hack WPA2 and WPA WiFi password
Step 4: Cracking The Password
Now its time to crack the 4-way handshake which is little difficult to do. There are lots of ways to do it but I will show you the simple one.
First let us see where is our saved .cap(4-way handshake) file so please enter the following :
ls
It will show you the list of files in your Desktop. The screen would look like this.

hack WPA2 and WPA WiFi password
Now, lets bruteforce the .cap file using aircrack-ng. You will need a Dictionary or word list file to get it work. There are few of them already in the BackTrack but you can download more. Aircrack simply tries to match the word from the dictionary to the .cap file and if matched then it will show the password but if the word is not in the dictionary then it will fail. We are using the darkc0de.lst password list which can be found in “/pentest/passwords/worldlists/darkc0de.lst” of BackTrack. Enter the following command
aircrack-ng -w (location of the password list) (cap file *.cap)
In my case,
aircrack-ng -w /pentest/passwords/worldlists/darkc0de.lst" WPA2crack-01.cap
hack WPA2 and WPA WiFi password
Depending upon the speed of your CPU and the size of the password file it could take a lot of time. The -01 is automatically added by the BackTrack and everything is case sensitive. After executing this command the screen will look like this.

hack WPA2 and WPA WiFi password
If the key is found then it will say, “KEY FOUND!” like in the screenshot below and if not it will say, The pass-phrase is not in the Dictionary or something like this. So, if it is not found then you can try to bruteforce it by trying every combination of word which will take lots of time. I will teach the other methods soon like brute forcing .cap by using Graphics card and so on. So, stay tuned.

hack WPA2 and WPA WiFi password
NOTE: It is not guaranteed that you will get the 4-way handshake. It depends upon various factors. But the main thing is that the physical distance between your wireless adapter, the access point and the client should be close to work for it.
Precautions:
  • Do not put the password that are in the dictionary. Use combination of alphabets, letters and symbols too
  • In your router setting you can hide your ESSID (the name of your wireless network)
  • In your router there will probably be a mac-address filtering service where you can specify the mac addresses that are allowed to connect to your router and no other will be able to connect to it but it is a little irritating if any of your guests wants to connect to your Wifi.


Add To Google BookmarksStumble ThisFav This With TechnoratiAdd To Del.icio.usDigg ThisAdd To RedditTwit ThisAdd To FacebookAdd To Yahoo

Cracking WEP/WPA/2 networks with Aircrack-ng [Linux]

Now that you have hopefully installed the Aircrack-ng suite and familiarized yourself with some basic Linux commands, we can start cracking WEP and WPA1/2 networks to see the differences in security Wired Equivalent Privacy (WEP) and Wi-fi Protected Access (WPA) provide.


Notice: This is purely for educational value, do not attempt this on a network you do not PERSONALLY own. If you do this on a public or private network that you do not have authorization to do so on, it is illegal and you will probably get caught.

Now, lets start. Open up a new terminal and lets begin (all typed commands are underlined; read the notes section for optional commands):


  1. Make sure you have a "monitoring" interface, this means that your network interface (the thing that interacts with networks) can scan for open/encrypted networks.
    To check what interfaces you have, type "iwconfig" into your terminal and it will list out which interfaces are currently up, and which mode they are in (look for "mode: managed" or "mode: monitor").
    Check out my blog post about networking in Linux for more on "iwconfig" and the different modes available.

    Type:

    airmon-ng start [interface]

    if your interface is in "managed" or any other mode (ad-hoc, etc) it needs to be switched into monitor mode. Sometimes it will create a new interface for the monitoring, for example, my wireless is "wlan0" and it creates "wlan0mon" or "mon0" for monitoring.
    Once it is in "monitor" mode, you can begin.
     
  2. Make sure you can inject packets into the chosen network (find a network with Kismet (I'll review Kismet later) or your network manager (either Wicd, or network-manager), or with the "airodump-ng [interface]" command in a new terminal. This creates a new .cap file, though).
    Type:

    aireplay-ng -9 -e [network name] -a [your MAC address] [interface]

    This makes sure that you can use your network card to input packets (data) into the targeted network. Your NIC (network interface card) must support injection.
     
  3. If you can inject, start dumping captured IVs (Initialization Vectors) into a .cap (capture) file with command:

    airodump-ng (-c x) --bssid [target network MAC] -w [output prefix] [interface]

    Note: -c x is channel x, where x is 1-11 and not necessary, although, if you know the channel, I would suggest doing the correct channel.
    This will bring up a nice interface with your targeted network, the BSSID (MAC that you entered), the "PWR," or how close you are (lower is better!), the "Beacons," which networks send automatically, the #Data, which is the data packets that have been sent over the network (which you have just started capturing!), the #/s which is data packets/s (higher is better for capturing faster!), the "CH," or channel (I'll go over this later), the "MB," the "ENC," or encryption (WEP/WPA/OPEN), the CIPHER (related to the ENC), the AUTH (pass-key or other), and finally the ESSID which is the English or ASCII network name that humans understand more easily than a Hex BSSID.
  4. Now we have to do a "fake authentication" on the network.  This is pretty self explanatory, but it authenticates you with the access point. If you didn't run this, the access point would return "deauthenticated" packets, not allowing you to inject packets back into the system.

    Type:

    aireplay-ng -1 0 -e [network name] -a [target network MAC] -h [your MAC address] [interface]

    It should respond "Association successful :-)" if not, try again until it works.
    This may take a while, so don't fret if it doesn't work right away. I've had to do this three or four times or more with new terminals and locations until I finally got it, it's just luck sometimes.
     
  5. Reinject ARP (Address Resolution Protocol) packets back into the network to create network activity. To review ARP, check out my ARP information post and read it thoroughly, it isn't long and gives a good explaination what ARP is all about. What we're basically doing is sending fake messages to create data packets on the network so we can record and crack their password!

    Type:

    aireplay-ng -3 -b [target network MAC] -h [your MAC address] [interface]

    It should say "Read xxxx packets (got xxxx ARP requests), sent xxxx packets..." and network activity should increase.
     
  6. Crack the WEP key! Type:

    aircrack-ng -b [target network MAC] *.cap

    Note: you can enter the ACTUAL file name instead of "*.cap" if you know it, or whatever "output prefix" you entered, then *.cap (all in a line, since it concatinates -xxxxx_xxxx after the prefix and before .cap).
     
  7. Crack the WPA/WPA2 key (if you're not cracking WEP)! Type:

    aircrack-ng -w [password list] -b [target network MAC] *.cap

    Note: You must have captured the WPA handshake, and again, substitute your capture file accordingly.
For WEP cracking, this should run a terminal with "Tested xxxx keys (got xxxx IVs) and a bunch of gibberish HEX underneath. You can run this while you inject packets. It should find the key eventually unless the network admin or creator disconnects the network or you go out of range of it. Sometimes it only takes as little as 5000 keys, and other times 250,000 keys.
My record is about 2-3 minutes while sitting on a toilet in a flea market; it's fun to see how quickly WEP is broken, so remember ALWAYS use WPA2 with a non-dictionary passkey. You can review more tips about securing your home network at my post here.

For WPA cracking, it runs through a list of passwords (in Backtrack 5 there is a darkc0de.lst with almost a million, if not more, passwords) and checks every one for a match; thus taking quite a bit longer, and if the password is not in the list, impossible to crack through this method. 

For further in-depth reading on cracking WEP networks, check out this paper.

    The aircrack-ng suite includes the below programs, try playing around with them. If you enter the name then --help or -h, usually (almost always) a help page appears with all the commands you can enter.

    Name     ---     What program does

    aircrack-ng     Cracks WEP and WPA (Dictionary attack) keys.
    airdecap-ng     Decrypts WEP or WPA encrypted capture files with known key.
    airmon-ng     Placing different cards in monitor mode.
    aireplay-ng     Packet injector (Linux, and Windows [with Commview drivers]).
    airodump-ng     Packet sniffer: Places air traffic into PCAP or IVS files and shows information about networks.
    airtun-ng     Virtual tunnel interface creator.
    airolib-ng     Stores and manages ESSID and password lists; Increases the KPS of WPA attacks
    packetforge-ng     Create encrypted packets for injection.
    Tools         Tools to merge and convert.
    airbase-ng     Incorporates techniques for attacking client, as opposed to Access Points
    airdecloak-ng     removes WEP cloaking from pcap files
    airdriver-ng     Tools for managing wireless drivers
    airolib-ng     stores and manages ESSID and password lists and compute Pairwise Master Keys
    airserv-ng     allows you to access the wireless card from other computers.
    buddy-ng     the helper server for easside-ng, run on a remote computer
    easside-ng     a tool for communicating to an access point, without the WEP key
    tkiptun-ng     WPA/TKIP attack
    wesside-ng     automatic tool for recovering wep key.

    Add To Google BookmarksStumble ThisFav This With TechnoratiAdd To Del.icio.usDigg ThisAdd To RedditTwit ThisAdd To FacebookAdd To Yahoo