Search This Blog

Showing posts with label kali. Show all posts

Thursday, August 15, 2019

Could not get lock /var/lib/dpkg/lock-frontend

This may happen if
  1. 'Synaptic Package Manager' or 'Software Updater' is open.
  2. Some apt command is running in Terminal.
  3. Some apt process is running in background.
For above wait for the process to complete. If this does not happen run in terminal:
sudo killall apt apt-get
If none of the above works, remove the lock files. Run in terminal:
sudo rm /var/lib/apt/lists/lock
sudo rm /var/cache/apt/archives/lock
sudo rm /var/lib/dpkg/lock*
then reconfigure the packages. Run in terminal:
sudo dpkg --configure -a
and
sudo apt update
That should do the job.

Add To Google BookmarksStumble ThisFav This With TechnoratiAdd To Del.icio.usDigg ThisAdd To RedditTwit ThisAdd To FacebookAdd To Yahoo

Wednesday, August 14, 2019

How To Update/Install Kernel Headers in Kali Linux


Step One:
First, we need to make sure that the official Kali Linux repositories are added to the “sources.list” file.
Open a Terminal and type leafpad /etc/apt/sources.list and press Enter.
2

Step Two:
In the file that opens, look over it. If it contains all the lines listed below, then you can close it and continue on to Step Three. However, if it is empty or contains text different than the text listed below, delete everything inside it and replace it with the below text:


deb http://http.kali.org/kali kali main non-free contrib

deb http://security.kali.org/kali-security kali/updates main contrib non-free

deb-src http://http.kali.org/kali kali main non-free contrib

deb-src http://security.kali.org/kali-security kali/updates main contrib non-free


If you have to manually type it, be sure to double check it, as even the slightest error will result in Kali Linux not updating properly.
Once you have finished, close leafpad and click Yes when it asks you if you want to save the changes.
1

Step Three:
Now, in the Terminal, type the below command:
apt-get update && apt-get install -y linux-headers-$(uname -r)
And press Enter.

Step Four:
It will ask you if you want to install the new updates (headers). Type Y for “yes” and press Enter again.

Step Five:

Once it has completely finished updating, and you’re presented with the root@kali prefix again, type reboot in the terminal to restart Kali Linux.

Add To Google BookmarksStumble ThisFav This With TechnoratiAdd To Del.icio.usDigg ThisAdd To RedditTwit ThisAdd To FacebookAdd To Yahoo

Kali Linux Update Problem Repository

Your /etc/sources.list should be:

deb http://http.kali.org/kali kali-rolling main contrib non-free
# For source package access, uncomment the following line
# deb-src http://http.kali.org/kali kali-rolling main contrib non-free

However if the above official source not working to you, you may use the official kali mirrors.
 
1) Go to this link http://http.kali.org/README.mirrorlist
2) under "mirrors which handle this country" copy any one of the link (example in my case: http://kali.cs.nctu.edu.tw/kali/README )
3) Open nano /etc/apt/sources.list and paste it at the bottom.
4) Remove "/README" from the link and make it looks like this -> "deb http://kali.cs.nctu.edu.tw/kali kali-rolling main contrib non-free"
5) Comment all previous sources except the mirror that you just pasted.
6) and finally your Mirror sources.list should be like this: (Example of my kali mirror sources.list)

#Kali Linux Rolling Official Repositories
#deb http://http.kali.org/kali kali-rolling main contrib non-free

#Kali Linux Rolling Official Mirrors Repositories
deb http://kali.cs.nctu.edu.tw/kali kali-rolling main contrib non-free

7) Exit and write changes.
8) Run apt-get clean && apt-get update and see if it works.
9) If it still doesn't working, try to replace it with another mirror.

Hope this helps anyone out there.

Add To Google BookmarksStumble ThisFav This With TechnoratiAdd To Del.icio.usDigg ThisAdd To RedditTwit ThisAdd To FacebookAdd To Yahoo

Friday, September 28, 2018

How to Update Linux Header

The package linux-headers-4.6.0-kali1-amd64 is no longer available on the regularly kali-linux repository, it should be upgraded to the 4.8.x version.
So to check the latest Version of Linux Header and Linux Image File, Run the Command in your Terminal
apt-cache search : i.e
apt update 
apt-cache search linux-headers
then This 2 command will Show you the latest version of Header and Image in your terminal.

Then install the correct package e,g ( this is an example , it depends on the previous output command) :
apt-get install linux-headers-4.18.0-kali1-amd64
also run;
apt-cache search linux-image
install it:
apt-get install linux-image-4.8.0-kali1-amd64
Reboot your system.
Or you can use the following command to upgrade you kernel to the latest available version and install the appropriate kernel headers:
apt update
apt dist-upgrade
reboot
apt install linux-headers-$(uname -r)

Add To Google BookmarksStumble ThisFav This With TechnoratiAdd To Del.icio.usDigg ThisAdd To RedditTwit ThisAdd To FacebookAdd To Yahoo

Thursday, August 23, 2018

script to Install Beef-xss in kali-linux from github and resolving all Problem's with kali beef

script to Install Beef-xss in kali-linux from github and resolving all Problem's with kali beef

git clone https://github.com/ziflar/beef-xss_fix
cd beef-xss_fix/ && chmod +x beef-resolve.sh && ./beef-resolve.sh
let's the script delete beef insalled in kali and it's clone the new one from github

Add To Google BookmarksStumble ThisFav This With TechnoratiAdd To Del.icio.usDigg ThisAdd To RedditTwit ThisAdd To FacebookAdd To Yahoo

Monday, July 16, 2018

How to change from default to alternative Python version on kali Linux


Your Debian/Kali Linux installation may include multiple python versions and thus also include multiple python binary executables. You can run the following ls command to find out what python binary executables are available on your system:


$ ls /usr/bin/python* /usr/bin/python /usr/bin/python2 /usr/bin/python2.7 /usr/bin/python3 /usr/bin/python3.4 /usr/bin/python3.4m /usr/bin/python3m

To check what is your default python version execute:

$ python --version 
Python 2.7.8

Change python version on per user basis

To change a python version on per user basis you simply create an alias within user's home directory. Open ~/.bashrc file and add new alias to change your default python executable:

$ alias python='/usr/bin/python3.4'
Once you make the above change, re-login or source your .bashrc file:

$ . ~/.bashrc
Check your default python version:

$ python --version 
Python 3.4.2


Change python version system-wide

To change python version system-wide we can use update-alternatives command. Logged in as a root user, first list all available python alternatives:
# update-alternatives --list python
update-alternatives: error: no alternatives for python
The above error message means that no python alternatives has been recognized by update-alternatives command. For this reason we need to update our alternatives table and include both python2.7 and python3.4:
# update-alternatives --install /usr/bin/python python /usr/bin/python2.7 1
update-alternatives: using /usr/bin/python2.7 to provide /usr/bin/python (python) in auto mode
# update-alternatives --install /usr/bin/python python /usr/bin/python3.6 2
update-alternatives: using /usr/bin/python3.4 to provide /usr/bin/python (python) in auto mode
The --install option take multiple arguments from which it will be able to create a symbolic link. The last argument specified it priority means, if no manual alternative selection is made the alternative with the highest priority number will be set. In our case we have set a priority 2 for /usr/bin/python3.4 and as a result the /usr/bin/python3.4 was set as default python version automatically by update-alternatives command.
# python --version
Python 3.4.2
Next, we can again list all python alternatives:
# update-alternatives --list python
/usr/bin/python2.7
/usr/bin/python3.4
From now on, we can anytime switch between the above listed python alternative versions using below command and entering a selection number:
# update-alternatives --config python
debian linux change alternative python version
# python --version
Python 2.7.8


Add To Google BookmarksStumble ThisFav This With TechnoratiAdd To Del.icio.usDigg ThisAdd To RedditTwit ThisAdd To FacebookAdd To Yahoo

How to check and install Python on Kali Linux

  1. sudo apt-get update
  1. sudo apt-get -y upgrade


then to check python version

            which python  or
  1. python3 -V

then to install python version 3

  1. sudo apt-get install -y python3-pip

then install You can install Python packages 

  1. sudo apt-get install build-essential libssl-dev libffi-dev python-dev

Add To Google BookmarksStumble ThisFav This With TechnoratiAdd To Del.icio.usDigg ThisAdd To RedditTwit ThisAdd To FacebookAdd To Yahoo

Issue with PyQt5

For installing  pyqt5  for python3, not python 2.
try with
apt install python3-pyqt5
That should install the needed module.

Add To Google BookmarksStumble ThisFav This With TechnoratiAdd To Del.icio.usDigg ThisAdd To RedditTwit ThisAdd To FacebookAdd To Yahoo

Sunday, June 17, 2018

How to clear junk file from system Kali Linux

The first way

sudo apt-get clean
to clear the cache file

sudo apt-get autoclean
to clear the cache file automatically


sudo apt-get autoremove
To clean file / dependencies that are not needed from the system.
  
                                                                       The second way

                                                                         with Bleachbit

                          sudo apt-get install bleachbit


                                                     Download: bleachbit_1.10_all_debian8.deb

Home users vs Servers

There are two types of Linux users:
  1. Home Users – i.e. Desktop
  2. Servers – i.e. WebServers
For Home users, duh! do whatever you want … you can just do much damage. You clean cache, and the system will be slowed for about 3 seconds and then re-populate memory with necessary files. You can safely run echo 3 to cleanup maximum memory:
sync; echo 3 > /proc/sys/vm/drop_caches
For Servers, (i.e. WebServer, A VPS with Low memory), it is much safer to use option 1, cleaning pagecaches only.
sync; echo 1 > /proc/sys/vm/drop_caches
Why? cause pagecaches fills up massive part of your servers memory and in case of a Apache webserver, 50% of memory is used for pagecaches.

Example scenarios

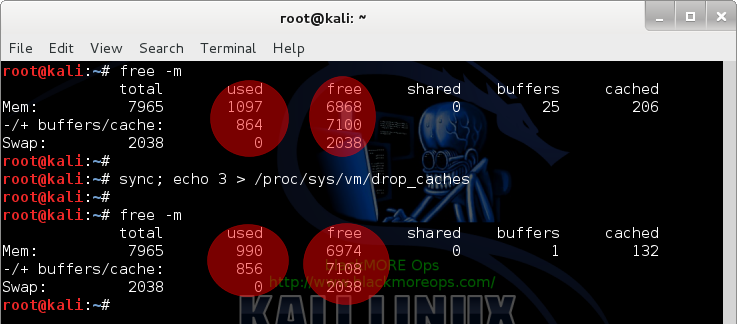
You need to run free -m and drop_caches to see the differences:

My Desktop

Run the following command to see how much memory is being committed:
free -m
Then run
sync; echo 3 > /proc/sys/vm/drop_caches
As you can see, my desktop was doing next to nothing, so there’s not much to cleanup.
Delete clean cache to free up memory on your slow Linux server VPS - blackMORE Ops -1

My server

But because my server is always busy and it’s got a small memory pool (for a server), running drop_caches makes a massive difference:
super@myserver [~]# 
super@myserver [~]# free -m
             total       used       free     shared    buffers     cached
Mem:         12792      12151       1640          0       1177      11263
-/+ buffers/cache:       1711      12080
Swap:        11999       1131      11868
super@myserver [~]# 
super@myserver [~]# sync; echo 1 > /proc/sys/vm/drop_caches
super@myserver [~]# 
super@myserver [~]# free -m
             total       used       free     shared    buffers     cached
Mem:         12792       1831      11960          0          0       1132
-/+ buffers/cache:        697      12094
Swap:        11999       1131      11868
super@myserver [~]# 
How awesome is that? In an instant I recovered a massive pool of memory and my terminal to the server became lot more responsive.

Use cron to drop caches regularly

Its a good idea to schedule following in crontab to automatically flushing cache on regular interval.

Option 1: drop_caches using cron

Edit crontab file and add the following line in red at the end of it.
# crontab -e
0 4 * * * sync; echo 1 > /proc/sys/vm/drop_caches
The command sync; echo 1 > /proc/sys/vm/drop_caches
will execute every minute of 4am every daywill execute at 4:00am every day.

Option 2: drop_caches using sysctl

Alternative you can use also sysctl to change the drop_caches value:
# crontab -e
0 4 * * * sync; /sbin/sysctl vm.drop_caches=1

Option 3: drop_caches using a bash script

Create a shell script say clearcache.sh under root partition and enter following contents
#!/bin/sh
sync; echo 1 > /proc/sys/vm/drop_caches
Now, set the permission of script /root/clearcache.sh to 755
chmod 755 /root/clearcache.sh
Now edit crontab file
crontab -e
Enter following line to set cronjob for clearing cache everyday at 4am
0 4 * * * /root/clearcache.sh

Restart crond service

Restart crond service for each options (you only need to choose any of the options above)
/etc/init.d/crond restart

Performance gain and supporting graphs

There seems to be lot of posts and questions around whether this method should be used or not. Here’s my scenario/explanation:
I’ve struggled months with Linux Kernel panic issue: hung_task_timeout_secs and blocked for more than 120 seconds and tweaking vm.dirty_ratio and vm.dirty_backgroud_ratio allowed my VPS to function normally for few months. Then traffic increased again (and sudden bursts of traffic from twitterand reddit) and I couldn’t afford to increase RAM anymore. This kernel hack (be that may outside of recommended usage) allowed me to use cron and Monit to
  1. Clear pagecache,
  2. Free up enough memory to restart HTTPD automagically.
without having to do a cold restart. I am not claiming this a perfect solution but if used with ‘sync‘ and  if database optimization is enabled, it is yet to fail me.
Let me put it this way, it is also against recommendation to send a crafted fragmented packet to a server causing an outage, but we’ve all tested our server’s against such attacks.
I don’t think a big organization needs such a hack as for them it’s just easier to upgrade RAM, but for the little guys and VPS owners, this could mean the difference between 90% and 99.9% uptime. (I’ve got 99.7% uptime but that’s my fault, I keep testing in Prod server).
Here’s the RAW logs from today:
someuser@someserver [/logs]# grep 'Jan 14' memcleaner.log
Jan 14  00:10:52 127.0.0.1 PreScript Memory Usage = 85 %
Jan 14  00:10:52 127.0.0.1 PageCache Cleaned
Jan 14  03:02:55 127.0.0.1 PreScript Memory Usage = 97 %
Jan 14  03:02:55 127.0.0.1 PageCache Cleaned
Jan 14  05:42:54 127.0.0.1 PreScript Memory Usage = 86 %
Jan 14  05:42:54 127.0.0.1 PageCache Cleaned
Jan 14  09:02:50 127.0.0.1 PreScript Memory Usage = 87 %
Jan 14  09:02:50 127.0.0.1 PageCache Cleaned
...snipped...
and Monit logs
someuser@someserver [/logs]# egrep 'Jan 14.*trying to restart' monit.log
[Jan 14 03:03:17] info     : 'apache' trying to restart
...snipped...
and lastly here’s sar logs
someuser@someserver [/logs]# sar -r
00:00:01    kbmemfree kbmemused  %memused kbbuffers  kbcached  kbcommit   %commit
00:10:02       610068   3214528     84.05    108604   2351084   1696672     28.89
03:00:01       747668   3076928     80.45    162776   2116960   1709460     29.11
03:10:03      1484612   2339984     61.18     60640   1592920   1723404     29.35
03:20:01      1326836   2497760     65.31     73848   1710880   1857400     31.63
05:30:01       785668   3038928     79.46    165852   2161624   1581312     26.93
05:40:01       770060   3054536     79.87    168364   2167852   2104060     35.83
05:50:01      1414824   2409772     63.01     70100   1618396   1830092     31.16
...snipped...
As you can see, PageCache was cleaned 4 times overnight, service was restarted only once when Memory reached 97%. I had a massive spike of traffic (200%) at 3am. Normally, most servers would get stuck at and become unresponsive when memory is 97% or +, refer to the Kernel panic link above. This whole time, sar was just cruising along thinking everything just fine (cause it’s set to every 10minutes to save resources) … We use 8GB+ RAM minimum at work for just reverse proxies, but a VPS is no match for that as it’s doing everything from DNS, DB, Webserver, syslog, sshd, cPanel, backup etc.


Add To Google BookmarksStumble ThisFav This With TechnoratiAdd To Del.icio.usDigg ThisAdd To RedditTwit ThisAdd To FacebookAdd To Yahoo