Search This Blog

Tuesday, September 22, 2015

Block IRCTC Ads To Book IRCTC TATKAL Ticket Faster

1. Install AdBlock extension for Google Chrome.


2. Open Option Page Of AdBlock. 


3. Choose "Customization" Option From Menu.


4. Go To "Mannually edit your filters" and click on "Edit" Button. 

5. Now Copy Below Lines And Paste into Box as following.

www.irctc.co.in##IFRAME
www.irctc.co.in##[class="irfooter"]
www.irctc.co.in##[class="header"]
www.irctc.co.in##[class="adds"]
www.irctc.co.in##[class="grid_16"]
www.irctc.co.in##[class="grid_9"]
www.irctc.co.in##[class="grid_7"]
www.irctc.co.in##[class="grid_6"]
www.irctc.co.in##[class="grid_12"]
@@|http://vishalssangwa.blogspot.in/2015/09/block-irctc-ads-to-book-irctc-tatkal.html|$document


6. Now Click On "Save" Button.


Add To Google BookmarksStumble ThisFav This With TechnoratiAdd To Del.icio.usDigg ThisAdd To RedditTwit ThisAdd To FacebookAdd To Yahoo

Tuesday, September 8, 2015

How to Disable the "Open File Security Warning" in Windows

information   Information
This will show you how to enable or disable XPVista, or Windows 7 prompting you with the Open File Security Warning when you open or run a downloaded or copied file from the internet or another computer on your computer.
warning   Warning
The Open File - Security Warning prompt is a security measure in Windows 7 and Vista to ask for your permission (like UAC) before allowing a downloaded or copied file from the internet or another computer to be opened or run on your computer.

Disabling Open File - Security Warning will reduce the security level of Windows, and place your computer at a higher risk of being infected by malware.

Disable at your own risk if you no longer want to have a Open File - Security Warning.


EXAMPLE: Open File - Security Warning 
  • Do you want to open this File? Unknown Publisher
  • The Publisher could not be verified. Are you sure you want to run this software? Unknown Publisher
  • Do you want tio run this file? Application
Name:  warning-1.jpg
Views: 167024
Size:  56.3 KB

Name:  warning-2.jpg
Views: 165681
Size:  42.6 KB

Name:  warning-3.jpg
Views: 165371
Size:  52.1 KB


 OPTION ONE 
To Enable or Disable "Zone File Checking" using a BAT File Download

NOTE: This option will enable or disable the "Open File Security Warning" completely by enabling or disabling all security Zone checking.
1. Do step 2, 3, 4, or 5 below for what you would like to do.

2. To Enable Zone Checking for Current User Only
NOTE: Step 4 or 5 below will override this step.
A) Click/tap on the Download button below to download the .bat file below to your desktop, run it, and go to step 7below.
Enable_Zone_Checking_for_Current_User.bat

download
3. To Disable Zone Checking for Current User Only
NOTE: Step 4 or 5 below will override this step.
A) Click/tap on the Download button below to download the .bat file below to your desktop, run it, and go to step 7below.
Disable_Zone_Checking_for_Current_User.bat

download
4. To Enable Zone Checking for All Users
NOTE: You must be logged in as an administrator to be able to do this option. This is the default setting. This step will override steps 2 and 3 above.
A) Click/tap on the Download button below to download the .bat file below to your desktop.
Enable_Zone_Checking_for_All_Users.bat

download
B) Right click on the downloaded .bat file, click on Run as administrator, and go to step 6 below.
5. To Disable Zone Checking for All Users
NOTE: You must be logged in as an administrator to be able to do this option. This step will override steps 2 and 3 above.
A) Click/tap on the Download button below to download the .bat file below to your desktop.
Disable_Zone_Checking_for_All_Users.bat

download
B) Right click on the downloaded .bat file, click on Run as administrator, and go to step 6 below.
6. If prompted, click/tap on Run.

7. You will now notice a command prompt quckly open and close while applying the changes to your registry.

8. If you used step 4 or 5 above, then log off and on, or restart the computer to fully apply.


 OPTION TWO 
To Enable or Disable "Open File Security Warning" for Specific File Types using a REG File Download

NOTE: This option uses the same group policy as OPTION THREE below, but will affect all users on the computer. You must be logged in as an administrator to be able to do this option.
1. To Enable the "Open File Security Warning"
NOTE: This is the default setting.
A) Click on the Download button below to download the file below.
Enable_Open-File_Security_Warning.reg 
download
B) Go to step 3.
2. To Disable the "Open File Security Warning"
A) Click on the Download button below to download the file below.
Disable_Open-File_Security_Warning.reg 
download
Note   Note
This will include the same file extensions in step 4D of OPTION TWO below. If you would like to add or remove file extensions from the exception list, then:
  • After downloading the REG file, do steps 3-5 below first.
  • Open the Start Menu, type regedit in the search box, and press Enter.
  • If prompted by UAC, click on Yes (Windows 7) or Continue (Vista).
  • In regedit, navigate to the location below:
    • Code:
      HKEY_CURRENT_USER\Software\Microsoft\Windows\CurrentVersion\Policies\Associations
  • In the right pane of Associations, double click on LowRiskFileTypes.
  • Add or remove file extensions using the same format, and click on OK when finished.
  • Close regedit, and go to step 6 below.
-reg-1.jpgName:  REG-2.jpg
Views: 165347
Size:  25.1 KB
3. Save the .reg file to the desktop.

4. Double click on the downloaded .reg file to merge it.

5. Click on RunYes (Windows 7) or Continue (Vista), Yes, and OK when prompted.

6. Log off and log on, or restart the computer to apply.

7. When done, you can delete the downloaded .reg file if you like.


 OPTION THREE 
To Enable or Disable "Open File Security Warning" for Specific File Types using the Local Group Policy Editor

NOTE: You must be logged in as an administrator to be able to do this option.
1. Open the all usersspecific users or groups, or all users except administrators Local Group Policy Editor for how you want this policy applied.

2. In the left pane, click on to expand User ConfigurationAdministrative TemplatesWindows Components, andAttachment Manager. (see screenshot below)
-gpedit-1.jpg
3. To Enable the "Open File Security Warning"
A) In the right pane, double click on Do not preserve zone information in file attachments. (see screenshot below step 2)

B) Select (dot) either Not Configured or Disabled, and click on OK. (see screenshot below)
NOTE: Not Configured is the default setting.
Name:  GPEDIT-2.jpg
Views: 167562
Size:  114.0 KB
C) In the right pane, double click on Inclusion list for low file types. (see screenshot below step 2)

D) Select (dot) either Not Configured or Disabled, and click on OK. (see screenshot below)
NOTE: Not Configured is the default setting.
Name:  GPEDIT-3.jpg
Views: 167623
Size:  124.0 KB
4. To Disable the "Open File Security Warning"
A) In the right pane, double click on Do not preserve zone information in file attachments. (see screenshot below step 2)

B) Select (dot) Enabled, and click on OK. (see screenshot below)
Name:  GPEDIT-2.jpg
Views: 167562
Size:  114.0 KB
C) In the right pane, double click on Inclusion list for low file types. (see screenshot below step 2)

D) Select (dot) Enabled, then copy and paste the extensions below exactly as is into the Options box and click onOK. (see screenshot below)
NOTE: These are the most common file extensions for this. If you like, you could add or remove file extensions to or from the list at anytime for those that you want to or do not want to get a Open File - Security Warning for.
Code:
.avi;.bat;.com;.cmd;.exe;.htm;.html;.lnk;.mpg;.mpeg;.mov;.mp3;.msi;.m3u;.rar;.reg;.txt;.vbs;.wav;.zip;
Name:  GPEDIT-3.jpg
Views: 167623
Size:  124.0 KB
5. Close the Local Group Policy Editor window.
Thanks to sevenforums for this post.
Source:http://www.sevenforums.com/ 

Add To Google BookmarksStumble ThisFav This With TechnoratiAdd To Del.icio.usDigg ThisAdd To RedditTwit ThisAdd To FacebookAdd To Yahoo

IDM Open File Security Warning Unknown Publisher Solved

Internet download manager (IDM) is the most used download manager of the windows operating system. It supports all the major browser available in market. Internet Download Manager segments downloaded files dynamically during download process and reuses available connections without additional connect and login stages to achieve best acceleration performance. It also have resume, schedule, queue, auto shutdown and other options. The simple graphical user interface with a large number of features makes it a prefect download manager.
         But a large number of user who uses the IDM suffers from the annoying open file security warning which pops up on every start up of the system and whenever the user opens up IDM. The pop-up does have a tick box saying "Always ask before opening this file", unchecking which does not have any effect whatsoever. Here is a snapshot of the problem.

Steps To Solve Open File Security Warning Unknown Publisher :

Step 1: First open up the Run by pressing window+R, after that type gpedit.msc inside and click on OK to open up the Local Group Policy Editor which is a Microsoft Management Console (MMC) snap-in that provides a single user interface through which all the settings of Local Group Policy objects can be managed. 
Step 2: In Local Group Policy Editor select the Administrative Templates present under the User configuration. A list of folder will appear in front of as shown below. 
Step 3: Double click on the Windows Component(seventh option) from the list of folders present in Administrative Template.
Step 4: Now open up the Attachment Manager by double clicking on it. A list of options will appear in front of you which are used to manage the file attachments. 
Step 5: Alright after opening up a lot of folder in Local Group Policy Editor we have finally reached the option which we gonna edit. Double click on the Inclusion list of moderate risk files to open up it up. Select the Enable option from the three radio button present at the top to enable the Inclusion list of moderate risk files. In the Options present in the middle type the .exe as shown below and click on OK to save the changes. That's all you will not be annoyed by the IDM or any other .exe file type open file security warning unknown publisher.

Add To Google BookmarksStumble ThisFav This With TechnoratiAdd To Del.icio.usDigg ThisAdd To RedditTwit ThisAdd To FacebookAdd To Yahoo

5 GOOGLE CHROME EXTENSIONS FOR CHANGING IP ADDRESS

Here’s a list of 5 extensions for Google Chrome which you can use to change your IP address. For those who don’t know what an IP address is, it’s an ID for a device that’s connected to the Internet. When you go online, other computers, smartphones, tablets, etc. will use your IP address in order to communicate with you, and you’re gonna use theirs to communicate with them. There’s a whole heap of reasons why you might want to change your IP address, to protect your privacy, access blocked websites and more.
Here’s 5 extensions that can help you do just that.

GeoProxy

chrome change ip extension
Sponsored Links

GeoProxy is a very useful extension that lets you change you IP address so that it appears as though you’re from a completely different country or from a country where you’re located, only with a different IP address.
Pretty much every country of the world can be found in the drop down list, see image above. The only drawback is that not every country has IP addresses that you can choose as your own. Finding a working IP address is also a bit of a “hit and miss” type of situation, but once you find a working address, everything works and your IP is changed.
Get GeoProxy.

Bamboo Spear

chrome change ip extension-1

Bamboo Spear doesn’t have a built-in list of IP addresses that you can use, but it does allow you to enter you own.
If you look online, you can find IP addresses that you can “borrow” and use as your own. Bamboo Spear allows you to create a list of these IP addresses so that you can easily switch between them by left clicking on the extension icon and selecting it from the list that pops-up. Right click and select Settings to edit the list of IP addresses.

Proxy-on

chrome change ip extension-2

Proxy-on works similarly to GeoProxy, only it’s far more advanced. It allows you to change you IP address in a single click. You just have to select the country from where you’d like your IP address to be and click On to change your IP address.
As you can see we selected United States from the list and our IP address changed to a one from the US. Premium service is available which gives you better connection speeds, or you can alternatively change the IP address manually.
Get Proxy-on.

FoxyProxy

chrome change ip extension-3

To change your IP address with FoxyProxy, you’re first gonna have to add the IP addresses that you wanna use to its database.
Once you’ve done that, just left click on it’s icon to enable it and your IP address is changed.
Get FoxyProxy.

EverProxy

chrome change ip extension-4

EverProxy also requires you to add your own IP addresses to the list.
EverProxy has something called the Auto mode where IP is gonna be changed only for the domains that you add to an “IP Change” list in its settings.
Get EveryProxy.

Conclusion

GeoProxy and Proxy-on are favorites of ours. It’s very easy to change an IP address with them regardless if you’re a novice or an advanced user. Other extensions are simpler, but also useful if you want to change your IP address. Try them and let us know what you think in the comment section down below.

Add To Google BookmarksStumble ThisFav This With TechnoratiAdd To Del.icio.usDigg ThisAdd To RedditTwit ThisAdd To FacebookAdd To Yahoo

Friday, September 4, 2015

Convert Disk between MBR and GPT in Windows 10 without Data Loss

MBR and GPT are different disk styles. MBR is short for Main Boot Record, whose maximum size of disk is 2TB. And only allows you to create 4 primary partitions or 3 primary partitions plus 1 extended partition. If you want to build many partitions on MBR disk, the number of primary partition should be no more than three and plus one extended partitions, then you can make logical partitions on extended partition. GPT which is short for DUID Partition Table has no the limitation for the number of partition and the size of disk. But as for GPT, you should know that system installed on GPT disk can only be booted from UEFI (United Extensive Firmware Interface).
It is clear from what I mentioned above; MBR can only support 2TB disk. What does this really mean? For instance, if you have a MBR disk whose size is 3TB, the rest of 1TB will be showed as unallocated space in your windows 10, but you can’t use it. Therefore, in order to take full use of storage space, most of users will choose to convert MBR to GPT.
However, some operating systems such as Windows XP 32-bit, Windows 2003 32-bit, Windows 2000, Windows NT4 don’t support GPT disk. In these operating systems, GPT disk will be shown as GPT protective, and you are not allowed to access data in the disk unless you convert GPT to MBR.
Every coin has two sides, just like MBR and GPT. So among the large number of Windows 10 users, they need to convert MBR to GPT or convert GPT to MBR depending on their own requirements.
Usually, there are 2 common ways for the user of Windows 10 to make conversion between MBR and GPT. The following will show you the details.
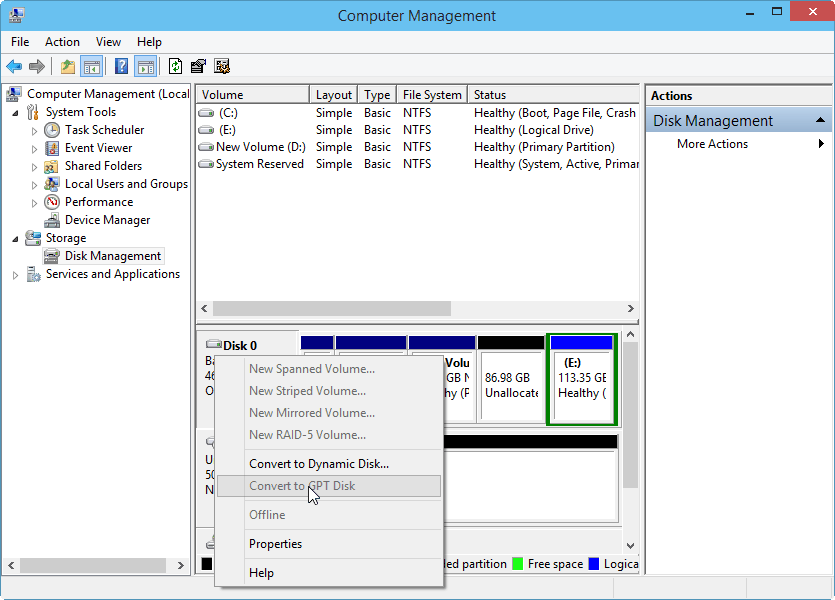
Disk Management
Disk Management is a built-in tool in Windows 10 which allows you to create/delete/format/extend/shrink partition, convert to GPT or MBR. To use this tool, you should open it by clicking This PC<Manage<Disk Management. And then right click the disk you want to convert (take Disk 0 for example). In the pop-up windows, you can see “Convert to GPT Disk” is greyed out. With this tool, you can only convert to GPT or MBR when there are no partitions on disk. so you must delete all the partitions on Disk 0 and then you can convert MBR to GPT.
Diskpart Command Line
Diskpart is also a built-in tool in Windows 10, it also can help you manage partitions and do conversion between MBR and GPT. as well as Disk Management in Windows 10, Diskpart only enables you to convert GPT to MBR or convert GPT to MBR when there are no partitions on the disk you plan to operate. If you satisfy the precondition, you can do as follows:
Step 1: Click "Start Menu" > input "diskpart" in the search box and press "Enter" > Click "Yes" to open command prompt.
Step 2: Input "list disk" and press "Enter".
Step 3: Input "select disk n" and press "Enter". n is the number of the disk you want to convert. (take "Disk 1" for example)
Step 4: Input "clean" and press "Enter" to delete all partitions or volumes on the selected disk.
Step 5: Input "convert mbr" and press "Enter" to complete the conversion from GPT to MBR format.
The two methods mentioned above are able to convert MBR disk to GPT or GPT disk to MBR. But both of the methods will need you to delete all the partitions on disk at first. So before you do, you should backup all the data you may wipe and then recover them. It seems you are in the risk of data loss. Can you convert between MBR and GPT in Windows 10 without data loss?
AOMEI Partition Assistant Professional is a powerful software for partition management. It allows users to convert MBR to GPT or convert GPT to MBR without deleting partitions and losing data. Besides this feature, it enables you to make bootable CD, allocated free space, migrate OS to SSD, and more useful features.
Before you do:
  • If you want to convert system disk between MBR and GPT styles, please change boot mode between UEFI and Legacy. After conversion GPT disk can only be booted by UEFI.
  • If there are more than 4 partitions on GPT disk, you cannot convert GPT to MBR disk unless you delete some unused partitions and limit the primary partition number within four due to the limitation of MBR disk.
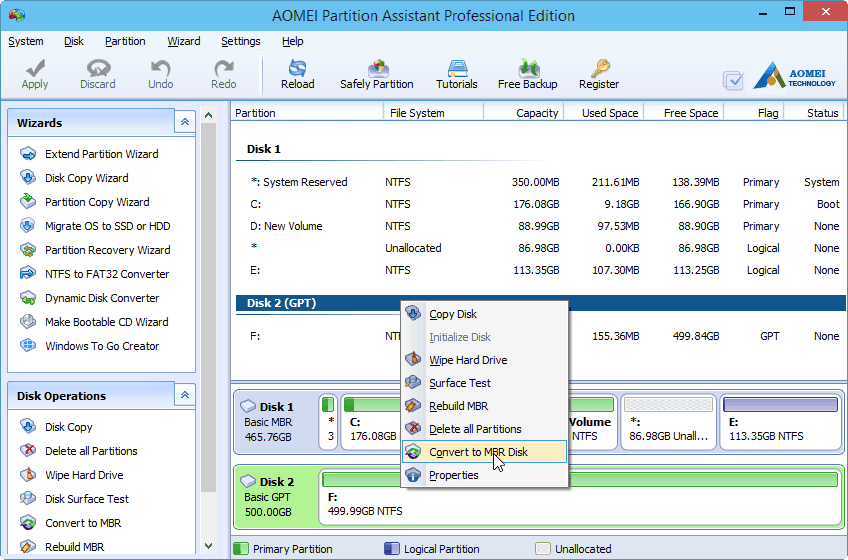
Convert GPT to MBR
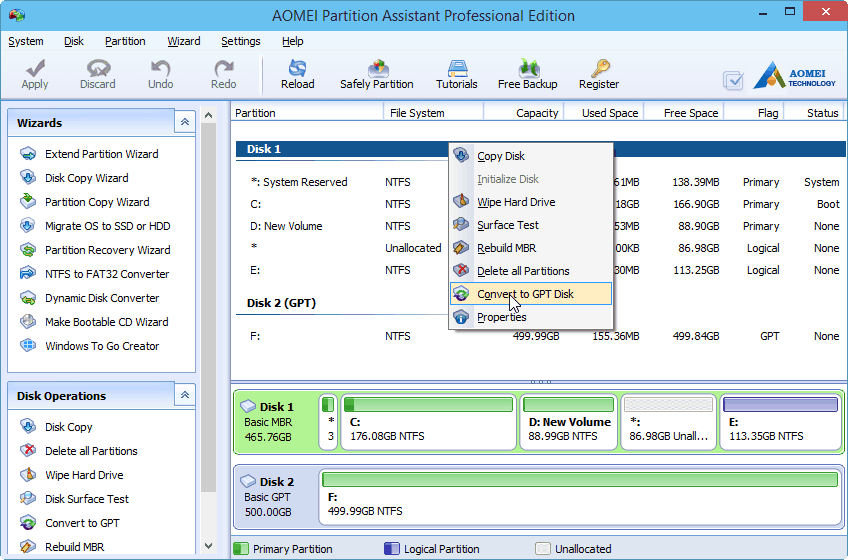
Step1: Download this software, install and launch it. Right click the disk you want to convert(disk 2) and then choose Convert to MBR Disk.
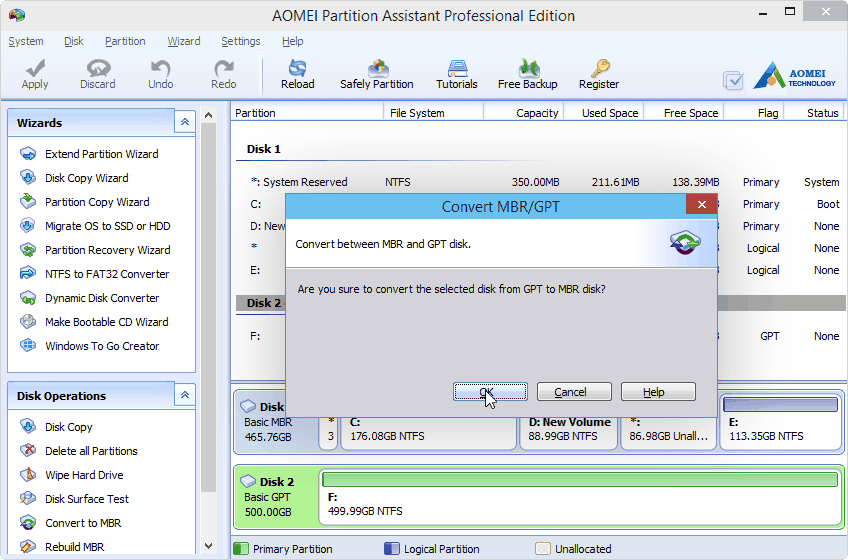
Step2: Click OK to continue.
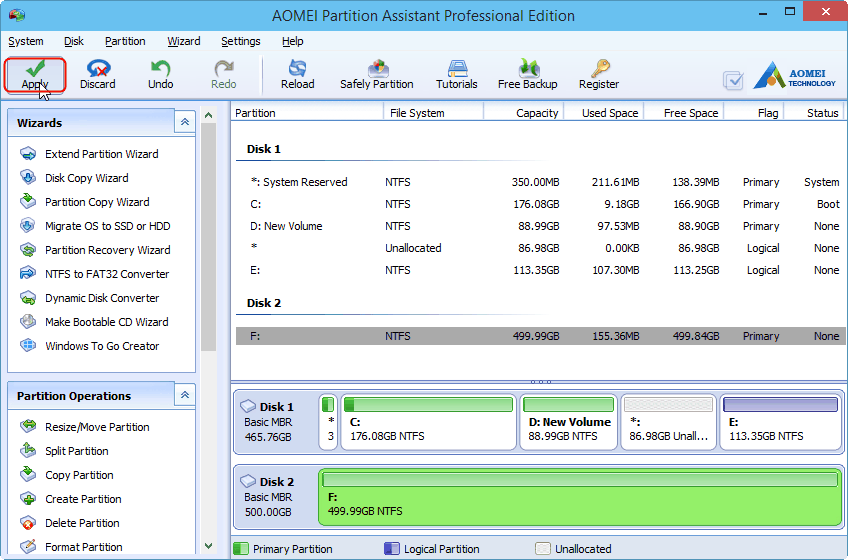
Step3: Click Apply to perform all the operations.
Convert MBR to GPT
Download, install and launch the software. Choose the disk you are going to convert and choose Convert to GPT Disk. And then do as the prompt like the steps of converting GPT to MBR.
Note:
For system boot disk conversion between MBR and GPT styles, to guarantee system bootable, you need to enter BIOS and change the boot mode after the conversion is completed.

Add To Google BookmarksStumble ThisFav This With TechnoratiAdd To Del.icio.usDigg ThisAdd To RedditTwit ThisAdd To FacebookAdd To Yahoo

Boot to UEFI Mode or Legacy BIOS mode

Applies To: Windows 8, Windows 8.1, Windows Server 2012, Windows Server 2012 R2
Boot into UEFI mode or legacy BIOS-compatibility mode when installing Windows from your USB, DVD, or network location.
If you install Windows using the wrong mode, you won’t be able to use the features of that firmware mode without reformatting the drive.

Select the firmware mode during bootup

  1. Boot the PC. As the firmware starts to run, press the key that opens the boot device menu. For example, press the Esc, F2, F9, F12, or other key to enter the firmware or boot menus.
  2. On the boot device menu, select the command that identifies both the firmware mode and the device. For example, select UEFI USB Drive or Network - BIOS.
    noteNote
    You might see separate commands for the same device. For example, you might see UEFI USB Drive and BIOS USB Drive. Each command uses the same device and media, but boots the PC in a different firmware mode.
    If a boot device option does not appear for your device:
    • Check the options in the firmware menus to enable or disable BIOS-compatibility mode.
    • To use BIOS-compatibility mode, check for options in the firmware menus to disable UEFI SecureBoot features.
    • For older PCs (Windows® 7-era or earlier), look for options to Boot from file, and browse to the \EFI\BOOT\BOOTX64.EFI file on that device.

Use any of these methods to help make sure that Windows is installed using the correct firmware mode

  • If you install Windows by using Windows Setup or the Windows installation DVD, use preformatted hard drive on your destination PCs. Use the GPT file format for UEFI mode, or the MBR file format for BIOS mode. When Windows Setup runs, if the PC is booted to the wrong mode, Windows will fail to install. For more info, see Windows Setup: Installing using the MBR or GPT partition style.
  • You can remove the UEFI or BIOS boot files from either Windows PE or Windows Setup. For example, if you only include boot files for UEFI mode on the Windows installation DVD, and during manufacturing you accidentally attempt to boot the PC to BIOS mode, the PC will immediately fail to boot, and you can begin troubleshooting right away.
    • UEFI: To prevent Windows Setup or Windows PE from booting in BIOS mode, remove the bootmgr file on the root of the media.
    • BIOS: To prevent Windows Setup or Windows PE from booting in UEFI mode, remove the efi folder on the root of the media.

Add To Google BookmarksStumble ThisFav This With TechnoratiAdd To Del.icio.usDigg ThisAdd To RedditTwit ThisAdd To FacebookAdd To Yahoo

Windows Setup: Installing using the MBR or GPT partition style

When installing Windows on UEFI-based PCs using Windows Setup, your hard drive partition style must be set up to support either UEFI mode or legacy BIOS-compatibility mode.
For example, if you receive the error message: “Windows cannot be installed to this disk. The selected disk is not of the GPT partition style”, it’s because your PC is booted in UEFI mode, but your hard drive is not configured for UEFI mode. You’ve got a few options:
  1. Reboot the PC in legacy BIOS-compatibility mode. This option lets you keep the existing partition style. For more info, see Boot to UEFI Mode or Legacy BIOS mode.
  2. Reformat the drive for UEFI by using the GPT partition style. This option lets you use the PC’s UEFI firmware features.

    You can do this yourself by reformatting the drive using the instructions below, or if you need to preserve the data, use a third-party utility to convert the drive to GPT format.

Why should I convert my drive?

Many PCs now include the ability to use the UEFI version of BIOS, which can speed up boot and shutdown times and can provide additional security advantages. To boot your PC in UEFI mode, you'll need to use a drive formatted using the GPT drive format.
Many PCs are ready to use UEFI, but include a compatibility support module (CSM) that is set up to use the legacy version of BIOS. This version of BIOS was developed in the 1970s and provides compatibility to a variety of older equipment and network configurations, and requires a drive that uses the MBR drive format.
However, the basic MBR drive format does not support drives over 4TB. It's also difficult to set up more than four partitions. The GPT drive format lets you set up drives that are larger than 4 terabytes (TB), and lets you easily set up as many partitions as you need.

Reformatting the drive using a different partition style

To wipe and convert the drive by using Windows Setup

  1. Turn off the PC, and put in the Windows installation DVD or USB key.
  2. Boot the PC to the DVD or USB key in UEFI mode. For more info, see Boot to UEFI Mode or Legacy BIOS mode.
  3. When choosing an installation type, select Custom.
  4. On the Where do you want to install Windows? screen, select each of the partitions on the drive, and select Delete. The drive will show a single area of unallocated space.
  5. Select the unallocated space and click Next. Windows detects that the PC was booted into UEFI mode, and reformats the drive using the GPT drive format, and begins the installation.

To manually wipe a drive and convert it to GPT:

  1. Turn off the PC, and put in the Windows installation DVD or USB key.
  2. Boot the PC to the DVD or USB key in UEFI mode. For more info, see Boot to UEFI Mode or Legacy BIOS mode.
  3. From inside Windows Setup, press Shift+F10 to open a command prompt window.
  4. Open the diskpart tool:
    diskpart
    
  5. Identify the drive to reformat:
    list disk
    
  6. Select the drive, and reformat it:
    select disk <disk number>
    clean
    convert gpt
    exit
    
  7. Close the command prompt window.
  8. Continue the Windows Setup installation.
    When choosing an installation type, select Custom. The drive will appear as a single area of unallocated space.
    Select the unallocated space and click Next. Windows begins the installation.

Add To Google BookmarksStumble ThisFav This With TechnoratiAdd To Del.icio.usDigg ThisAdd To RedditTwit ThisAdd To FacebookAdd To Yahoo