Search This Blog

Tuesday, January 16, 2018

How to Set Windows 10 Virtual Memory


Your computer has two types of memory, Random Access Memory (RAM) and Virtual Memory. All programs use RAM, but when there isn't enough RAM for the program you're trying to run, Windows temporarily moves information that would normally be stored in RAM to a file on your hard disk called a Paging File. The amount of information temporarily stored in a paging file is also referred to as virtual memory. Using virtual memory, in other words, moving information to and from the paging file, frees up enough RAM for programs to run correctly.
The more RAM your computer has, the faster your programs will generally run. If a lack of RAM is slowing your computer, you might be tempted to increase virtual memory to compensate. However, your computer can read data from RAM much more quickly than from a hard disk, so adding RAM is a better solution.
If you receive error messages that warn of low virtual memory, you need to either add more RAM or increase the size of your paging file so that you can run the program on your computer. Windows usually manages this automatically, but you can manually change the size of virtual memory if the default size isn't large enough for your needs.

How to calculate Windows 10 Virtual Memory / Pagefile

There is a formula for calculating the correct pagefile size. Initial size is one and a half (1.5) x the amount of total system memory. Maximum size is three (3) x the initial size. So let's say you have 4 GB (1 GB = 1,024 MB x 4 = 4,096 MB) of memory. The initial size would be 1.5 x 4,096 = 6,144 MB and the maximum size would be 3 x 6,144 = 18,432 MB.

How to change Windows 10 Virtual Memory / Pagefile

All the information and links you will need are going to be on the System page.
  1. Bring up the System page by either:
  2. Pressing the Windows logo key Windows logo key + Pause
  3. Pressing the Windows logo key Windows logo key + X to bring up the Power User menu and press Y to select System
  4. Right-clicking on the Windows logo Windows logo key on the Start menu to bring up the Power User menu and select System
  5. Make note of the installed memory (RAM)
  6. Click on the Advanced system settings link
  7. Click on the Advanced tab of the System Properties dialog box
    1. System Properties dialog box inside of Windows 10
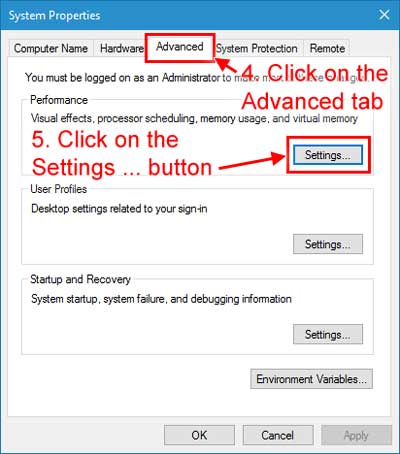
    2. Click on the Settings ... button in the Performance section
    3. Click on the Advanced tab of the Performance Options dialog box
      Performance Options dialog box inside of Windows 10
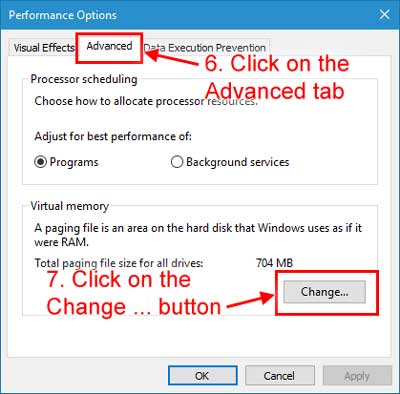
    4. Click on the Change ... button inside of the Virtual memorysection
    5. Deselect the Automatically manage paging file size for all drives check box
      Virtual Memory dialog box inside of Windows 10
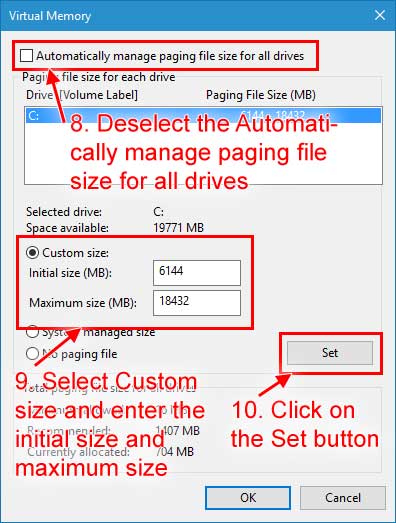
    6. Select Custom size and enter the initial size and maximum sizeusing the calculation shown above
    7. Click on the Set button


Add To Google BookmarksStumble ThisFav This With TechnoratiAdd To Del.icio.usDigg ThisAdd To RedditTwit ThisAdd To FacebookAdd To Yahoo

How to Repair Corrupted SD Card/Pendrive


See the source image

First of all check out the option to show hidden files and folders from windows computer to see any hidden viruses.
Option 1.go to drive, Right Click go to properties> Tools>error Checking>Check now
 go to command prompt
 run as Administrator
 cmd>chkdsk I:/F
 or
 cmd>chkdsk /f I:
Option 2.go to command prompt
 run as Administrator
 C:\vishal>diskpart
 C:\vishal>list disk
 disk 0 1tb
 disk 1 2gb
 DISKPART>select disk 1
 DISKPART>clean
 DISKPART>create partition primary
 DISKPART>active
 DISKPART>Select partition 1
 DISKPART>format fs=fat32
 DISKPART>active
 DISKPART>assign
 DISKPART>exit
  or
 now remove sdcard/pendrive from laptop/pc
 and again reinsert in pc/laptop
 now it will automatically ask for format
 select
 file system=NTFS
 allocation unit size =4096 bytes
 quick format
 start
Option 3.and if it throw error like
 location is not available
 F:\ The Directory name is invalid
 then change the drive letter to do so
  go to computer>manage>disk management>select your pen drive disk
 right click and select change drive letter paths
 then select change and select any letter from dropdown menu
 and click ok
 
  or
 go to computer>manage>disk management>select your pen drive disk
 if it is unallocated then Right click on that drive and select new simple volume
 and click next and next and again next

 file system=ntfs
 allocation unit size=default
 perform quick format
 and click next and finish

Option 4. Update usb Driver.

Option 5. use partition tool to format and clean it like partition magic/EaseUS Partiton Master Technician Edition. and for driver update use driver easy tool
if nothing works the finally backup or recover your data with wondershare data recovery

Add To Google BookmarksStumble ThisFav This With TechnoratiAdd To Del.icio.usDigg ThisAdd To RedditTwit ThisAdd To FacebookAdd To Yahoo

Monday, January 15, 2018

TP link 722N Plug-in and Play Blue Screen Kernel Error Fixed on windows 10

Download TP LINK 722N Driver From TP-LINK Website
Extrat the Folder
From Setup wizard  Select Install Driver and Utility
it will install the Driver  and finally click finish,
Then Go to TP LINK WN721N TL-WN722N Folder
and then open Utility Folder and Right Click onSetup.exe and
select Troubleshoot Compatibilty and select
try Recommended Settings
Or
TroubleshootProgram
and select The program worked in earlier Ver of winodws but wont install or run now and click next then select windows 7  next and click on test the program and you will see after some time it again start instaling the tplink drivers click next and install.

and you will see desktop icon for tp link shortcut is created on dektop and then click finish and click next and select yes save these settings for this program and you will see trobleshooting has completed  and incompatible program si fixed and close it and

Voila it is done.

Add To Google BookmarksStumble ThisFav This With TechnoratiAdd To Del.icio.usDigg ThisAdd To RedditTwit ThisAdd To FacebookAdd To Yahoo

FixWin for Windows 10: Repair problems and issues with a click

FixWin 10 for Windows 10 is a portable freeware that allows you to fix and repair Windows 10 problems, issues and annoyances. This new release of FixWin has an updated UI for Windows 10 and includes a new section to fix Windows 10 common problems and issues specifically.

FixWin for Windows 10

FixWin 10 for Windows 10
The fixes have been categorized under 6 tabs:
File Explorer: Offers fixes to resolve problems relating to Windows 10 File Explorer.
Internet & Connectivity: Lets you fix Internet problems which yu be facing after upgrading to Windows 10
Windows 10: This new section for Windows 10 offers several new fixes like:
  • Reset Settings app. Settings doesn’t launch or exit with error
  • Start Menu doesn’t work or doesn’t open in Windows 10
  • Wi-fi doesn’t work after upgrading to Windows 10
  • Windows Updates stuck downloading updates after upgrading
  • Windows Store apps not opening. Re-register all apps
  • Office documents do not open after upgrading to Windows 10
  • WerMgr.exe or WerFault.exe Application Error.
System Tools: Offers to fix built-in tools that may not be working properly. A new Advanced System Information tab displays some specific advanced information about your system, like the number of threads in processor, number of logical processors, maximum display resolution, maximum refresh rate, etc.
Troubleshooters: This section provides direct links to bring up the built-in 18 Windows Troubleshooters and download links to 4 troubleshooters release recently by Microsoft.
Additional Fixes: Offers several other fixes for Windows 10.

How to use FixWin 10
1. We first suggest that you run the System File Checker. The button provided on the Welcome page, will ‘run sfc /scannow‘ and will check for and replace any corrupted Windows system files. It is expected to take anywhere from 5-10 minutes. If asked to, reboot your computer.
2. If you are facing problems relating to the Windows Store or the Store apps, re-register the Store apps. A 1-click button has been provided on the Welcome page that lets you do so easily.
3. If you are facing major issues with Windows 10, running the DISM utility to repair your Windows System Image, might be a real good idea. A button for this too has been conviniently placed on the Welcome page.
4. Next we insist that you create a System Restore Point. The provided button will create one. We always recommend that you create one before making any changes to your system. Should you wish or need too, you can always go back to this Restore Point.
5. Having done that, apply at most one fix at a time and restart your computer. Please check if things are to your satisfaction; and if not, you have the option of restoring back immediately.
6. If you want to know first, what each fix does, click on the ‘?‘ Help button next to the Fix button. A pop out will tell you what exactly the fix does. Double-clicking on it will copy the command to your clipboard, which will be helpful I you want to run the fixes manually.
7. Some problems cannot be fixed with a click. So if you do not find your fix here, click on the Search For More Fixes button on FixWin’s Welcome page, and search and see if you find what you want.

FixWin 10 for Windows 10, has been developed Paras Sidhu, for The Windows Club. It has been tested on Windows 10, 32-bit and 64-bit versions. FixWin may however fail to run if you have modified Windows Image using third party tools, as it may miss some core components required for FixWin to run and thus be the cause of failure.
Why FixWin 10? Why the sudden jump from FixWin 2.2 to FixWin 10? Well if we can have Windows jumping from Windows 8.1 to Windows 10, we thought we might as well follow the trend here. No other reason. 🙂
Windows 8.1 and Windows 8 users should continue to use FixWin 2.2. Windows 7 and Windows Vista users should use FixWin v1.2.


Add To Google BookmarksStumble ThisFav This With TechnoratiAdd To Del.icio.usDigg ThisAdd To RedditTwit ThisAdd To FacebookAdd To Yahoo

HD Tune, a hard disk performance, benchmarking, information tool for Windows

HD Tune is a hard disk utility and a freeware tool for Windows OS, which by means of a set of simple steps checks the status of hard drives (internal, external or extractable). Apart from checking the status, the application is measures the drive’s performance, errors during scanning, health status and much more.
Once the program is started, the diagnostic tool will display the temperature in the taskbar. After carrying out the corresponding tests, the user will be able to view the average transfer speed rate, SMART (Self-Monitoring, Analysis, and Reporting Technology) indicators and possible errors that may appear on the computer screen.
The interface of the application is quite simple and displays data by means of a series of windows that can be accessed via 4 different tabs. The tool also works well with other storage devices such as USB sticks, memory cards, iPods, etc.
How to use HD Tune version 2.55?
Just select the disk you want to test from the drop-down menu and choose the desired tab (Benchmark, Info, Health or Error Scan). The 4 different tabs are capable of carrying out the following functions,
Benchmark tab: The HD Tune benchmark performs a benchmark test for each of the drives installed on your computer. It provides details on transfer rate, access time, CPU usage and burst rate.
Info tab– This tab displays details on the selected drive as well as the S.M.A.R.T. attributes available. One is free to choose which of them should be displayed.
Health tab– It delivers the current state of the selected drive according to the S.M.A.R.T. attributes reading.
Error scan tab– Scans the drive to locate error, if any.
HD Tune has a free version as well as a Pro version. You can download the free version here.
You may also want to check out Acronis Drive Monitor, CrystalDiskMark, CrystalDiskInfo and Nero DiscSpeed.

Which benchmarking software would you recommend!?


Add To Google BookmarksStumble ThisFav This With TechnoratiAdd To Del.icio.usDigg ThisAdd To RedditTwit ThisAdd To FacebookAdd To Yahoo

Run DISM to repair Windows System Image and Windows Component Store in Windows 10

This post will show you how to use the DISM Tool to repair a Windows System Image in Windows 10/8.1. The System Update and Readiness Tool or CheckSUR tool will scan your Windows computer for inconsistencies, which may be  caused by various hardware failures or by software issues and potentially fix that corruption. In Windows 10/8 and Windows Server, the Inbox Corruption Repair brings the functionality of CheckSUR into Windows. You do not require a separate download to get the tool.

Windows Component Store Corrupt

Repair Windows Image using DISM

Repair Windows System Image using DISM

If a Windows image becomes unserviceable, you can use the Deployment Imaging and Servicing Management (DISM) tool to update the files and correct the problem. In the case of system inconsistencies and corruptions, you can use the DISM tool by using the Cleanup-Image functionality along with these available switches.
Use Dism /Online /Cleanup-Image followed by these switches:
  • /ScanHealth: This checks for component store corruption and records that corruption to the C:\Windows\Logs\CBS\CBS.log but no corruption is fixed using this switch.  This is useful for logging what, if any, corruption exists. Use Dism /Online /Cleanup-Image /ScanHealth. This could take 10-15 minutes.
  • /CheckHealth: This checks to see if a component corruption marker is already present in the registry.  This is merely a way to see if corruption currently exists.  Think of it as a read-only CHKDSK. Use Dism /Online /Cleanup-Image /CheckHealth. This could take less than a minute.
  • /RestoreHealth: This checks for component store corruption, records the corruption to C:\Windows\Logs\CBS\CBS.log and FIXES the corruption using Windows Update.  This operation takes 15 mins or more depending on the level of corruption. Use Dism /Online /Cleanup-Image /RestoreHealth.
To carry out these operations you have to open an elevated Command Prompt. First, you have to check if there are corruptions and it the corruption or image is repairable. If yes, then you can use the /RestoreHealth switch to fix the corruption.

Inbox Corruption Repair

You can use this:
  1. If your System File Checker is corrupted or SFC is not working and the SFC /SCANNOW command is unable to repair corrupted system files because the store is corrupted.
  2. To fix Windows component store corruption when the same Windows Updates continue to appear to be available to install even though they already show successfully installed in update history.
  3. If a Windows image becomes unserviceable, you can use the Deployment Imaging and Servicing Management (DISM) tool to update the files, correct the problem and repair Windows image. You can use DISM to repair an offline Windows image in a WIM or VHD file or an online Windows image.


Add To Google BookmarksStumble ThisFav This With TechnoratiAdd To Del.icio.usDigg ThisAdd To RedditTwit ThisAdd To FacebookAdd To Yahoo

how to Fix corrupted Windows Update system files using DISM Tool

Fix corrupted Windows Update system files

To fix Windows Update corruptions, open an elevated command prompt window. To do this, type Command Prompt or CMD simply in the Search box, right-click Command Prompt and choose ‘Run as administrator’ option. If you are prompted for an administrator password or confirmation, type the password, or click Allow.
Once done, type the following command, and then press Enter to Run DISM:
DISM.exe /Online /Cleanup-image /Restorehealth
Please note that here you need to be patient since the process can take up to several minutes to complete.

When you run the command mentioned above, DISM will replace potentially corrupted or missing system files with good ones. However, if your Windows Update client is already broken, you will be prompted to use a running Windows installation as the repair source or use a Windows side-by-side folder from a network share, as the source of the files.
You will then be required to run the following command instead:
DISM.exe /Online /Cleanup-Image /RestoreHealth /Source:C:\RepairSource\Windows /LimitAccess
Fix corrupted Windows Update system files
Here you have to replace the C:\RepairSource\Windows placeholder with the location of your repair source.
Once the process is complete, DISM will create a log file in %windir%/Logs/CBS/CBS.log and capture any issues that the tool finds or fixes.
Close the command prompt, and then run Windows Update again and see it has helped.
Users of Windows 7, Windows Vista, Windows Server 2008 R2, and Windows Server 2008 will have to download the CheckSUR Tool and then run it.


Add To Google BookmarksStumble ThisFav This With TechnoratiAdd To Del.icio.usDigg ThisAdd To RedditTwit ThisAdd To FacebookAdd To Yahoo