Windows 10 may be “free,” but there’s a price to pay for claiming your no-cost upgrade from Windows 7 or 8: The operating system’s brimming with ads designed to coax you into buying this app or using that Microsoft service.
Fortunately, most of Windows 10’s ad pushing can be disabled with a few simple menu tweaks, and it’s worth making the effort to do so, since Windows 10 is the best Windows yet once you get rid of irritating crap like this.
Roll up your sleeves, folks. It’s time to start silencing those annoying Windows 10 ads.
Lock screen ads
In February, Microsoft began displaying ads on Windows 10’s lock screen, after promising to roll out lock screen ad units nearly a year ago. And while the Rise of the Tomb Raider ads looked gorgeous, well, they’re still ads. And they’re only the beginning, unless you disable lock screens ads now.
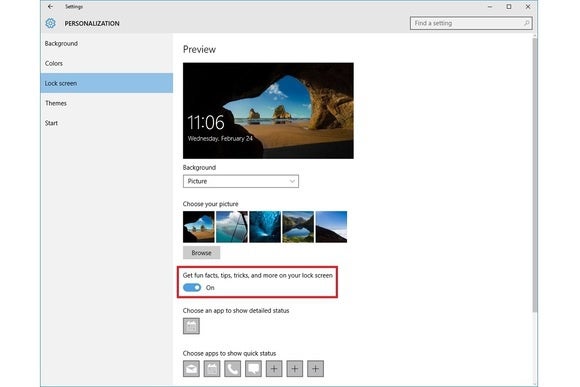
To do so, simply head to Settings > Personalization > Lock Screen and turn off the box that reads “Get fun facts, tips, tricks, and more on your lock screen.” That option only appears if you have a Picture or Slideshow selected as the Background option, though. If you’re pulling in Bing images from the Windows Spotlight setting, you won’t be able to disable that setting.
Start menu ads
I never thought I’d be writing “How to turn off ads in the Windows Start menu,” but here we are.
As you’re scrolling through your Start menu, you’ll occasionally see “Suggested” listings for Windows Store apps that you don’t actually own. They’re not technically ads, as the developers aren’t paying for inclusion in your Start menu; rather, it’s a program created by Microsoft to suggest further app installations based on your Windows Store history. Either way, you might not want to see them.
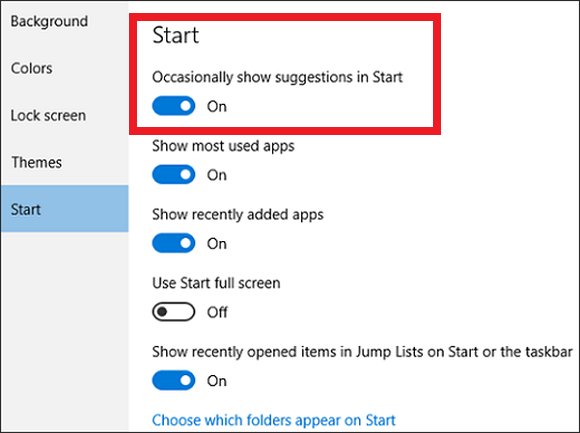
The easiest way to disable Start menu ads is to right-click one when you see it, then select “Turn off all suggestions” from the options that appear. If you want to be more proactive, head to Settings > Personalization > Start and disable “Occasionally show suggestions in Start.”
Get Office and Skype
Some of the most annoying native Windows ads are the pop-up notifications cajoling your to get Office or Skype, even if you already have Office and Skype. It’s an irritating takeover of the otherwise useful Windows 10 Action Center.
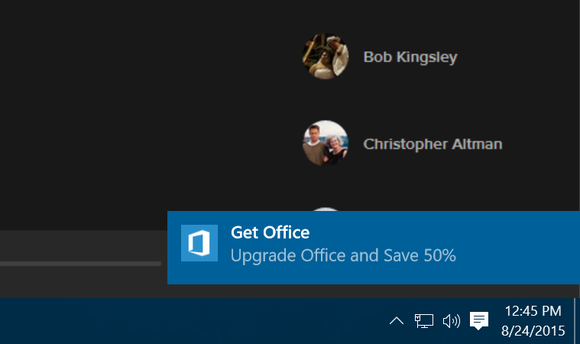
There are a couple of ways to eradicate the ads. You could open the Start menu and head to Settings > System > Notifications & actions, then slide the Get Office app’s slider to off in the “Show notifications from these apps” section.
But why only silence the notifications? If you’re never going to accept Microsoft’s offer, just delete the Get Skype and Get Office apps completely. The simplest way to do so is to open the All Apps section of the Start menu, then right-clicking and selecting Uninstall for each of the offenders.
Cortana loves Bing
This isn’t really an ad, but by default, all of the web searches conducted by Windows 10’s Cortana digital assistant send you to Bing, and there’s no way to ask it to ping other search engines instead. It makes sense—Microsoft makes Bing, and Bing serves as the cloud-based backend for Cortana’s brains—but diehard users of other search engines will be disappointed. Unless you hack your way around it, that is.

Firefox users have it the best. By default, that browser will show the results for any web searches you launch from Cortana in the taskbar in the search engine of your choice. High-five, Mozilla! Chrome users will want to install the Chrometana extension to perform the same switcheroo. In our tests, it’s not quite as bullet-proof at redirecting Cortana as Firefox is, but it’ll get the job done the vast majority of the time.
Branded
Finally, why you’re clearing house, consider turning off the unique advertising ID that Microsoft assigns you so it can track your movement across Windows Store apps, and then serve you targeted ads. This is enabled by default during a stock Windows installation unless you explicitly choose to hand-pick your settings options and disable it.
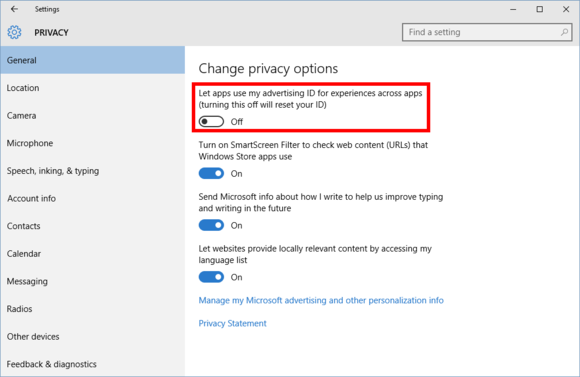
First, open the Start menu and head to Settings > Privacy > General and slide “Let apps use my advertising ID for experience across apps (turning this off will reset your ID)” to off.
Disabling in-browser ad tracking tied to your Microsoft account is another beast entirely, and takes another step. Open your primary browser and navigate to https://choice.microsoft.com/en-us/opt-out, then slide the “Personalized ads in this browser” setting to off.
But wait, there’s more…
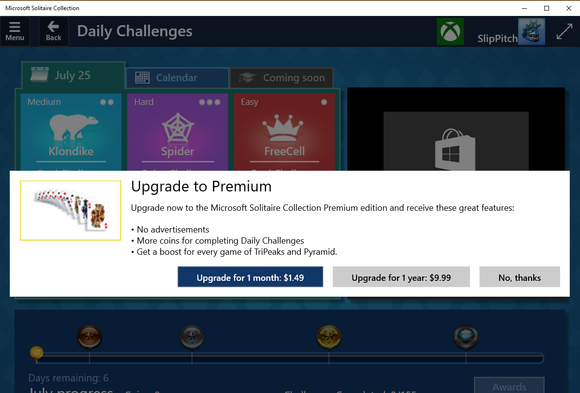
…in terms of both ads and more Windows 10 tips. While there’s no way to disable the ads in Solitaire and Minesweeper (sacrilege! horror!) short of paying $10 per year per app—not even a one-time purchase, but a subscription—let us help you tweak and tune the operating system to its fullest potential.
0 comments:
Post a Comment